Patolli: Android Game Localization

In the course Software and Game Localization, our team proudly localized an app based on Android system through Android Studio. The game is called Patolli, which is derived from one of the oldest games in America. The game board consists 52 squares in X shape and there would be two players with 4-6 markers. They will roll the dice in turn and determine how many steps they can move the markers. The winner will be the one who can get all markers from one end of the queue to the other.

We begin the localization with assets analysis, followed by the i18n and l10n process, and a play test to make sure the game is consistent in different devices.

Here are

Click the links below to view the game before and after localization into Chinese.

Patolli-en    Patolli-zh

Internationalization

After getting the assets, we played the game and quickly located the strings in the source codes. The texts in the pop-up windows are located in java files, and the static UI texts are found in xml files, which majorly deal with the UI layouts. In order to prepare for localization, our team worked on the strings and make them internationalizable by replacing strings with @string/name-of-string in xml files and used R.string.name-of-string to replace strings in the java files. However, the second practice proved to be problematic.

After some research, we found out that R.string is defined as an integer and we need more methods to extract the content in the string. There are three ways to get the content. First one is using getString() or getResources().getString() wrap the integer. The second one is to use getResources().getText(R.string.name).toString() to wrap the string. In this method, the getText function gets the texts with styles, thus we need a toString method to return the actual string. The third method is use String.valueOf(R.string.name) to wrap string. This is a method autho-suggested by Android Studio when it detected our errors.

After wrapping the strings, we listed all strings with their keys in a strings.xml file, where we also commented the sections of the strings so to provide a clear outlook just to make sure we include all strings(see image below). The strings file is now ready to be sent to translators for localization.

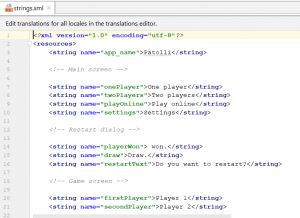
Sectioned Strings in strings.xml

Localization

We used Memsource to translate the strings, downloaded the localized xml file and then placed it inside a values-zh folder we created under value folder. While we are editing the strings.xml file, we noticed that there is a built-in tool at Android Studio that can be used for small-scale games to localize their strings. The tool is called Translation Editor. After syncing the project, you can right-click the strings.xml file and choose to open it in Translation Editor.


Interface of Translation Editor in Andriod Studio

The above photos shows how the strings in the Editor will look like. You can add a locale simply by clicking the globe icon, and a locale folder will be automatically created under value folder. This automation can help you avoid naming the locales the wrong way. The plus and minus sign at the top left corner can be used to add or remove a key and associated translation. There are also filters at the top menu to help you sort all the strings by the key and locale. We think this tool shows great effeciency when dealing with small games with only a few strings.

Localization QA Testing

After all the localization is done, our team decided to test this game, particulary its function and display in different screen sizes. We choose 4” and 5” to see if there is any truncation or layout issues. Luckily, everything works well on different screens.


Magazine Design & Localization Using InDesign

Project Introduction:

As the final project of the course Multilingual Desktop Publishing, I used InDesign to design a magazine layout from scratch, filled it with photos and contents and then localize it into Simplified Chinese with the translation tool, SmartCAT.

In this blog I am going to describe the process of my creation and localization, focusing on things I have learned in this project, from the application of gridlines, some useful shortcuts, best practices of content editing and localization. First of all, let’s enjoy my 6-page magazine and its Chinese version in the following gallery! The assets I used are retrieved from The Louvre Museum.

This slideshow requires JavaScript.

The Challenges & Lessons Learned:

About Text Editing

1. Through this project, I have learned some basic steps of creating a magazine layout. Here’s a brief summary of the process I went through to create the layout.

  • Set the margins and gridline base
    • The space between baseline grids is set to be 11, catering for the character size of English texts.
  • Create text and image frames
    • Add the framework of images and texts based on guides
  • Insert page number and notes on the master page
  • Insert text placeholders to estimate the number of characters it can hold, create paragraph styles
    • Create different paragraph styles for body texts and captions
  • Insert texts and adjust styles
    • Align the texts to the baseline grid; deal with orphan text; create a drop cap

2. When preparing for localization, you can set the text frame as “auto-sized”, so that the text frame would expand with the text length. You can choose which direction and to what extent it can expand, as the image below shows.

3. When the texts bleed out of the text box, you can have an overview of the content and the overflowed content by right click the text and choose to edit the texts in the storyline, which shows the words count and overflowed texts clearly.

In the image above, the texts besides the redline are overset texts. On the ruler, you can also see the word count.

4. It is always a good practice to show the hidden text, just in case you might accidentally delete something when editing the translation. For example, when changing the format of the translation, I accidentally delete the space between the dates and the notes in the text box at the very bottom. The base between them is created by pressing “shift+tab”, which makes the texts goes to the ends of the text box.

About Localization Into Chinese

1. After translating the IDML file in SmartCAT, the exported translation file does not show the Chinese characters properly, and I need to select an appropriate font style. This also means that the paragraph styles I build for English texts can not be reused for Chinese characters, as they require different style settings. Thus I need to recreate the paragraph styles for the translation.

2. The Chinese characters do not fit the baselines created for English texts. As the images show below, the Chinese characters are too crowded with the original baseline setting.

Solution: I changed the baseline space to 13 points, which makes the paragraphs look more natural in Chinese, as the image below shows. Since the texts length actually shrank after translation, the expansion of baseline space perfectly let the Chinese texts fill the whole content space in the magazine.

3. The drop cap is impossible to translate in the CAT tool, and it needs to be recreated.

Solution: I used the same method to create the Chinese “drop cap”. To do that, I selected the character and created outlines, then duplicate the outlined character and apply different colors. Remember to change the filling of the characters into “paper” so that they are not transparent. Then, you can group the outlines together as a single object (as the image shows below), then adjust its position based on your preference.

4. In the localized file from SmartCAT, the “em space” in the bottom text box is gone after I applied Chinese character fonts. Thus I need to re-insert them.


Translation Management System: Portfolio Collection

In the course Translation Management System, I’ve learned several different TMS systems, including their features, functions and tested them out through mock-up projects. The TMS we have touched upon are SDL WorldServer, XML, Lingotek, and among them all WorldServer is the tool that we used most.

What I’ve gained about WorldServer:

  • manage translation memories and termbases
  • create workflow, project type and then create the project
  • configure filter setting
  • configure cost and QA settings

In the final project of this course, me and four other team members worked on a localization project with WorldServer. We ddecided to translate five projects of Gentle Monster, fashion brand with branches around the world,  from English into Korean, Japanese, and Simplified Chinese, and then prepare the deliverables in Photoshop.

In this project, my main roles are the project manager and localization engineer. I calculated the cost of this project and help assigned the task among my team members according to the deadline and our availabilities. In addition, I setted up the steps on WorldServer, creating project types, workflows for TEP and pseudo translation, and leveraging TM and TB resources. Here’s the assets of this project:

Project Proposal

Deliverables 

Presentation on Lessons Learned


TMS Comparison and how to choose

So how the different TMSs differenciate with each other and how to choose a TMS that suits you the most?

I created an infographic explaining the tips for choosing the right TMS. Click here to view it.

If you want to know more about the differences between different TMS, you can refer to my presentation (click here) on how the workflow functions of WorldServer, XTM and Lingotek are different. I believe you will have a clearer idea of their workflow features after going through my slides!

Other posts written by me:

Translation Crowdsourcing: You can know about the reasons and risks of crowdsourcing, companies and vendors that have build the platforms and an example of Transifex on how it controll the quality using voting function.

Multidimensional Quality Metrics: You can get a clear idea of what is MQM and its features, how it differentiate with other QA systems and why to some extent it is evolutionary.


Adv CAT: QA Model, Pseudo Translation, Machine Translation

There are several main focuses of the source Advanced CAT. One is to use Trados to congifure the filter settings of XML files for pseudo localization, the other one is training a machine translation engine. I would say without hesitation that MT training is one of the most strenuous projects I have done!

Here is a brief summary of what I have gained in this course:

Pseudo localization with Trados:

I learned to set filter configurations for XML files, excluding unnecessary contents such as hyperlinks, and including encoded contents, image descriptions, titles and bodies. To do that, we need to download the XML file from wordpress and import it to Trados, then add the tags and elements to exclude. Finally, don’t forget to choose to include embedded content, as this is easily overlooked. I used WordPress for practice as a testing website. Click here to view the website with pseudo translation uploaded.

Quality Assurance models:

The model we explored the most is Multidimensional Quality Metrics (MQM). I’ve learned the structure and concepts behind this model, and the flexible and adaptable characteristic of the metrics. Click here to view an article written by me and know more about MQM and its customizable features. Other focuses of this theme include Taus Dynamic Quality Framework (DQF) and  LISA QA Metric developed by Localization Industry Standards Association.

These QA metrics can be integrated into the QA functions of CAT tools or can be used to develop a QA scroring system, such as MQM Scorecard. On this platform, you can tag the target or source segments with MQM error types, calculate the scores and generate quality reports.

Tools to help quality check:

Okapi Olifant: using this tool, you can customize filters to show translations that met the rules. For example, you can view target segments that are the same with their source, or use the operations options to build your own rule. Below is a screenshot of the app interface:


Okapi Checkmate: This is a tool for customizing QA model and performing checks on the target texts. It provides a concise interface showing the flagged issues, as the image below can show.


Utilities for localization: 

I also did a video introduction about Greenshot, a light, handy and convenient screenshot tool that can be helpful for your daily work. It is configured with the most used apps like MS Office Suite and can be linked with Adobe Creative Suite, which promotes the convenience of editing and sharing threenshots. Click here to view my introduction and comments on this tool!

Machine Translation Engine Training:

In this course, I learned about three types of machine translation, and they are rule-based machine translation, statistical machine translation (also called phrase-based MT), and nueral machine translation.

The most rewarding thing I experienced is Machine Translation Engine Training. It is a really exciting project and also very challenging. The following texts of this post will introduce you the project I did with my teammates and the lessons we gained from this experience. I have also published a detailed introduction on the lessons learned from MT pilot project.

For translation machine training, we were asked to use Microsoft Translator Hub to do a test project. I initiated the topic of patent law translation, because it is easier to find open source data in this field and me and my teammates are all farmiliar with patent contents.

We proudly conducted a pilot project for MT training and we achieved a satisfying result of translation using the MT engine we deployed. To train the engine, we need to gather a huge number of data to feed it, and test the quality with human translators. Below is the workflow of our pilot project:

I played different roles in this project, as the project manager, engineer and reviewer. I initiated the topic and won the support of my teammates, evalutated the progress and made adjustments to meet our goal, and I did cost and time analysis. In addition, I was also the reviewer, who reviewed the translated strings and grade them based on the QA model of MQM.

From this project, I learned the importance of doing a pilot project when the picture is not clear, and how to apply the data from pilot project and predict the cost and time of the whole project. Below is the proposals of the pilot project and updated proposal based on our practice. You can also find the presentation on the lessons we learned from this try out project.

Original Proposal

Update Proposal 

Lessons Learned


SMT Training for Patent Laws (Using Microsoft Translator Hub)

This is one of the most adventurous projects I have done at MIIS! In the course Advanced Computer-Assisted Translation taught by professor Adam Wooten, we were asked to explore Microsoft Translator Hub, train a machine translation engine in the form of a pilot project. The topic we choose is to train an translation machine customized for patent laws. Our source language is Chinese, target language is English. After the pilot project, we were asked to give a proposal of the whole project, which is translating 40,000 characters.

Along the way, me and my groupmates met all kinds of frustrations and challenges in almost every aspect of this project. From the chart below you can know how the project goes:

As you can see, there are four major stages in our project. Before actually do the training, we need to estimate the cost and time of the project and calculate how fast/cost-effecient PEMT (machine translation + post-editing) can be compared with human translation. We also need to present the client how we can ensure the quality of PEMT, and what quality we can achieve.

However, we made a mistake at the very beginning while making these estimations. We assume that PEMT must be faster and cheaper than human translation, which is not necessarily true. The speed and cost really depends on a variety of factors, including the volume, text type, SMT engine condition etc. The most reliable way is to test it out. And our final esitmation of PEMT time including machine training, based on our experiment of the machine, can be 5% lower to 30% faster than human translation. The chart below is our metrics for time&cost estimation of the whole project.

What I also learned is never estimate the influence of assumptions, because they can also influence your mind and judgement! Because we assume PEMT is faster, when we are calculating post-editing speed, we came out a number that is later proved not even close to the real situation.

In terms of the quality of machine translation, we let human translators review the texts translated by machine and deduce points based on selected MQM metrics. Our group members reviewed around 300 strings and we came up with a conclusion that the satisfying translation should achieve 700 out of 1000 scores. We also timed ourselves while doing post-editing, and found out we are way slower than we thought. Because the SMT engine is not fully trained yet, there are some major adjustments that need an editor do.

Other Lessons Learned:

1. A low BLUE score does not equal to bad quality. Some of the translations from low score engines are pretty decent, as we observed.

2. Garbage in, garbage out. Some of the training data we put in contains mis-spelling words and fragmented texts, which results in similar issues of the machine translation.

3. Microsoft Translator Hub is not that reliable. The training results are not that predictable. During the process, the training platform malfunctioned for a day or two, thus our systems just failed. Sometimes we failed for no reason.

4. The data input must be large volume. When we did not put in enough data, the system warned us about the minimum requirements for engine training. Our group got a comparatively very high BLUE score and decent translation result, grealty because our training data is huge.

Deliverables:

Proposal for Pilot Project

Proposal for Whole Project (based on lessons learned from pilot)

Presentation on Whole Project Proposal and Lessons Learned


Translation Crowdsourcing that Engages the Global Community

Translation crowdsourcing emerged when online community develops in a fast pace with a huge volume of online content generated. It is faster than traditional translation, because it involves a large translators community. It is with more human-touch than machine translation, which is better dealing with uniform texts. These are also the reasons why some corporations love to leverage volunteer resources for certain translation projects.

Some examples include Facebook’s translation app, Twitter, and Translators Without Borders. For different organizations, the meaning and benefits of translation crowdsourcing might be different. As for for-profit organizations, engaging users in the process of product localization can increase user loyalty and expand its exposure in the target market. In addition, crowdsourcing can also bring them higher productivity compared with traditional means and shorten their time-to-market. For nonprofit organizations such as TWB, volunteers are the pillars of its operation, and translation crowdsourcing is an important way to expand their community and spread their missions.

However, translation crowdsourcing is not just as handy as it looks. Managing a huge global community requires strategies that are different from traditional translation management. Generally speaking, there are four major parts to consider concerning with the translation process: cost, time, human resource and quality. Facebook invests a lot to build a collaborative translation platform for volunteers to streamline the process. Thus, the cost of translation crowdsourcing is not just as “free” as you may have thought. How to ensure the deadline is met and encourage volunteers to finish translations is another important issue to consider. This also has to do with how you motivate the volunteers by understanding their needs. Depending on their interests, you may list their names in the contributors list and try to make their API easy and flexible to use. Because there will be a huge amount of text to review and most of the texts do not necessarily have to be refined, there can be automated QA processes to control the quality to a certain level.

There are companies build their own translation crowdsourcing platforms, like TWB and Facebook. There are also some using services from TMS like Smartling, Transifex and Lingotek. Here are some key features of Transifex’s crowdsourcing translation. It proposes two ways of translation. One is the normal translation-review process. Another is to gather suggestions from contributors and automatically apply the most voted one as the translation, and this is called the crowdsourcing mode.

Suggest translations | Source: Transifex

Voting on Suggested Translations | Source: Transifex

Transifex also suggests companies create style guides for volunteers to follow. It propoeses that communication is pivotal to engage volunteers, and a discussion/announcement system would benefit greatly for both volunteers and translation managers. According to Transifex, recognizing top contributors is important and would make volunteers feel appreciated, thus promoting a good collaborative relationship. Tips for organization to engage the community inclusing send swags, holding gatherings and inviting them for office visits etc.


References:

https://docs.transifex.com/guides/crowdsourcing-translations

https://docs.transifex.com/translation/suggesting-translations-for-crowdsourced-projects

Facebook Taps Users to Create Translated Versions of Site” by Michael Arrington, TechCrunch, January 21, 2008

Can Companies Obtain Free Professional Services through Crowdsourcing? ” by Adam Wooten, DeseretNews.com, February 18, 2011

People-powered Translation at Machine Speed” by Jessica Roland, MultiLingual, January 2014


MQM: A Framework of Customizable Metrics for Translation Quality

Multidimensional Quality: 

Multidimensional Quality Metrics (MQM) is a system that allows you to create a customized tool to evaluate translation quality based on your needs. As the name tells, MQM first admits that the quality of translation can be multidimensional.  The system is based on a new definition of quality translation raised by Lommel, saying that ” A quality translation demonstrates required accuracy and fluency for the audience and purpose and compiles with all other negotiated specifications, taking into account of end-user needs. ” His definition extends beyond traditional definition of translation and tends to unify different metrics, such as conventional requirements of accuracy and perspectives from users and manufactures.

Given these various factors to assess translation quality, MQM is born to organize the metrics into categories. It uses a “family-child” relationship to depict different issue types, which weaves a huge web. The graphic below shows part of the system. The main branches in the graphic are some of the  dimensions of translation quality, and the “twigs” are different specifications of them.


Target-Oriented Feature of MQM:

The biggest difference of MQM compared with traditional QA method is that it is function-oriented and fully-customizable, taking into the project goal for consideration. This can be exemplified well with its “Verify” dimension. “Verify” is used to describe issues where the text is not appropriate to the using environment.

Unlike other issue types, “Verify” deals with extra-linguistic issues. For example, when translating/adapting an employment contract from one judicial system to a different one, the content of the original might be greatly changed to suit the need and legal norms in the target culture. Then the issue goes beyond traditional language quality metrics on terms and language, and focuses on the intended market and readership. In other words, “Verify” cannot be tested unless the target audience and text purpose are provided. Although there are some debates concerned with the dimension “Verify” among language professionals, it is still glad to see that MQM is taking a broad vision of translation practice and QA.


Possible challenges brought by Customizable Quality Metrics:

Although customization allows flexibility with testing rules according to different text type and translation goals, it may also result in inconsistency if different users in the same project do not cooperate closely. Since there are a lot of issue types in this system, it is necessary to create templates or guidance to ensure consistency.

For projects with minute differences, it may also require effort to customize the QA tool for each of them in some cases. However, based on the client’s requirement and limited resources, the user really needs to make decision on whether it is worthwhile to customize it. In addition, it may also pose challenges if the client suddenly changes the goal of the project, as the setting is target-based. Communication with the client on project goals seem more vital so to avoid further adjustment of QA settings.


References:

Multidimensional Quality Metrics Definition

Multidimensional Quality Metrics (MQM): A Framework for Declaring and Describing Translation Quality Metrics

Assessing Translation Quality with MQM


Sites DOT MIISThe Middlebury Institute site network.