Desktop Publishing Final Project Statement
This project was created with Photoshop using its 3-D font function, which was incorporated to the Photoshop functions set only in 2012. For this reason, not many people seem to be very familiar with it.
This final project is a showcase of how the 3-D Font function can be an efficient way of creating artistic effects on texts compared with the traditional way of using the “effect” function. Texts involved are from Denny’s Grand Slam Advertisement (a piece of advertisement designed to market its food compo at a lower price). Before the description starts, let us take a look at what the original picture looks like:

To re-create a localized version of this picture (in Chinese), three parts appear to be difficult:
1) The 3-D effect on the text. Note that 3-D effect is composed of white and red, something very difficult simply with the “effect” function.
2) The two figures on the left and right of the text. Note that parts of these figures’ arms are hidden behind the text, which makes it pretty hard to extract the figure from the picture and put it in a localized version. Without the original project files from which the advertisements were created, it would be very annoying to decide where to put the figures in the localized version so that the audiences don’t notice the missing arm part. Although “drawing” the missing arm part might be a solution, it is neither easy nor practical.
3) Translation Problem. This advertisement involves two figures standing on top. However, the “Grand Slams” literally translates into “大满贯” in Chinese. With only 3 characters, it is somewhat hard to know where to insert the figures once the translation is done.
In the light of these 3 difficulties, I adopted the following 3 strategies to solve them.
First, regarding the 3-D effects, instead of using the “effects” function, I resorted to the newly-added 3-D Font function, which allowed you to manually adjust the angle, source light, shadow and colors of the 3-D fonts. Look at the picture below:
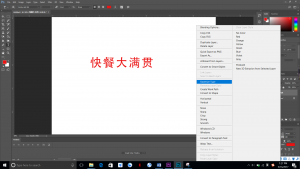
After you create the text layer, do not remember to right click on the layer and “Rasterize Type”. This move allows the computer to know that you are making this layer a pixel-based layer, rather than a vector one.
After this, you can start using the 3D-font function:

Click on 3D. Then choose “New 3D Extrusion from Selected Layer”. There might be a dialog that pops up asking you whether you want to change into “3-D Work Space”. I recommend a “yes” to this question. Then you will see the following:

· Change the direction of the text by dragging while pressing the left button.
· Play with all the settings to see how the text changes in color, shape and shadow.
· Please remember to save your file at any time, particularly if your computer (and especially GPU) is not good enough to process 3-D images.
· A recommended setting for this project:
Thus, the 3-D effect is created.
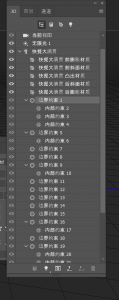
Secondly, my strategy in dealing with the hidden arm part is simply to create a new layer for each figure (which I extracted from the original picture by directly cropping). Then, I put the layer behind the text layer to use the text layer to cover larger part of the figure than did the previous layer in the original picture.
Result:

Now the project is finished.
And in case you have confusions over the third difficulty: translation. What I did is to look for a longer translation: “快餐大满贯” instead of “大满贯”. The new translation translates back into English as “fast food grand slam”, which, under this context, conveys the same meaning.
Now the work is finally done.
Comparison between the original and localized version:
If you have any questions, please do not hesitate to contact me at xiaoc@miis.edu
