All things local

Author: Ghio Anton

Localizing with Android Studio

App Localization

From 2014 to 2016, I worked as an App Specialist at Apple. I reviewed a variety of apps that were in English, Spanish, French, and Portuguese. While my job did not entail actual linguistic review, I couldn’t help but be affected by my poor experience in the non-English versions on the app. Having just completed my third semester at the Middlebury Institute of International Studies (MIIS), those mistakes have become that much more obvious.

Android Studio/Xcode

When I had the opportunity to use both Android Studio and Xcode to localize two apps, I was curious to see how localization worked within both integrated development environments. For the most part, there wasn’t anything that really stood out between them. In Xcode, all strings can be exported in one step by exporting to XLIFF using Apple’s Base Internationalization. This export/import feature extracts the localizable strings to an external XLIFF file.

In Android Studio, on the other hand, there are different ways you can export text for translation, including an export to an Excel spreadsheet. For example, you can: 1) from res -> strings -> right click-> Open Translations Editor. Then copy and paste the data required from Translations Editor to excel and 2) Import the resulting Excel-based translations back into the Translation Editor.

Localizing Omni-Notes

Since I have worked with both Xcode and Android Studio, I want to discuss my experience localizing an app using Android Studio. Searching for an app that would build was a cumbersome experience in both programs. After nearly 5 hours of searching, I was ecstatic to find a workable app called Omni-Notes. After it successfully built, I realized the actual content of the app was underwhelming. As you can guess from the app name, it’s a simple note-taking app.

However, herein lies one of my first mistakes: assuming the simplicity of the app would translate to a smooth localization process. As I will get into shortly, Omni-Notes was already localized into many languages, and understanding how that process took place was key to the project’s success.

Retracing the Developers Steps

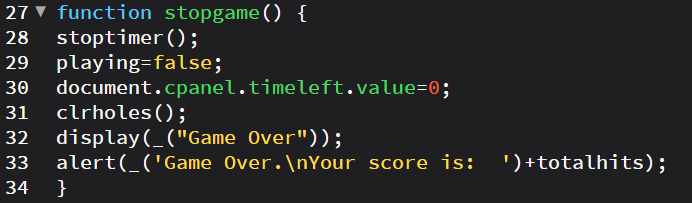
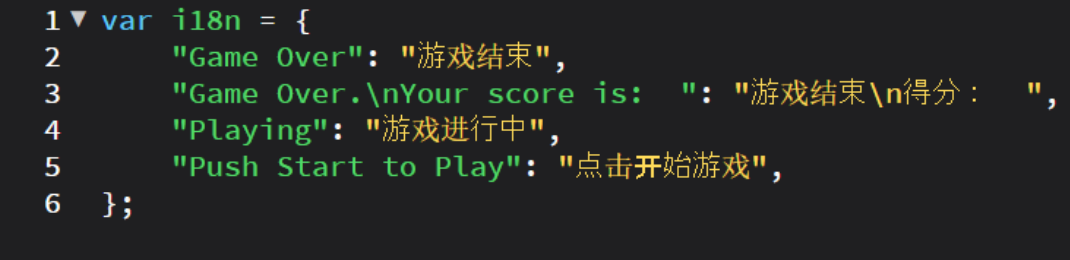
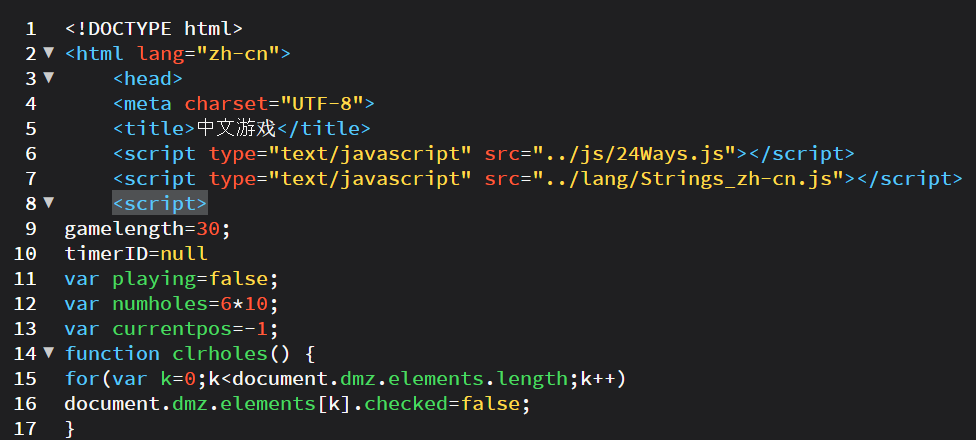
According to Android’s Localize the UI with Translations Editor, one of the first things that needs to be done is locate the strings.xml file. Each project has a default strings.xml file, which is set to a default language. In the case of my project, the default language was set to English.

Locating the strings.xml file in the Omni-Notes project

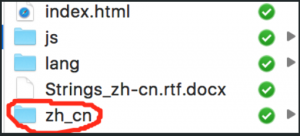
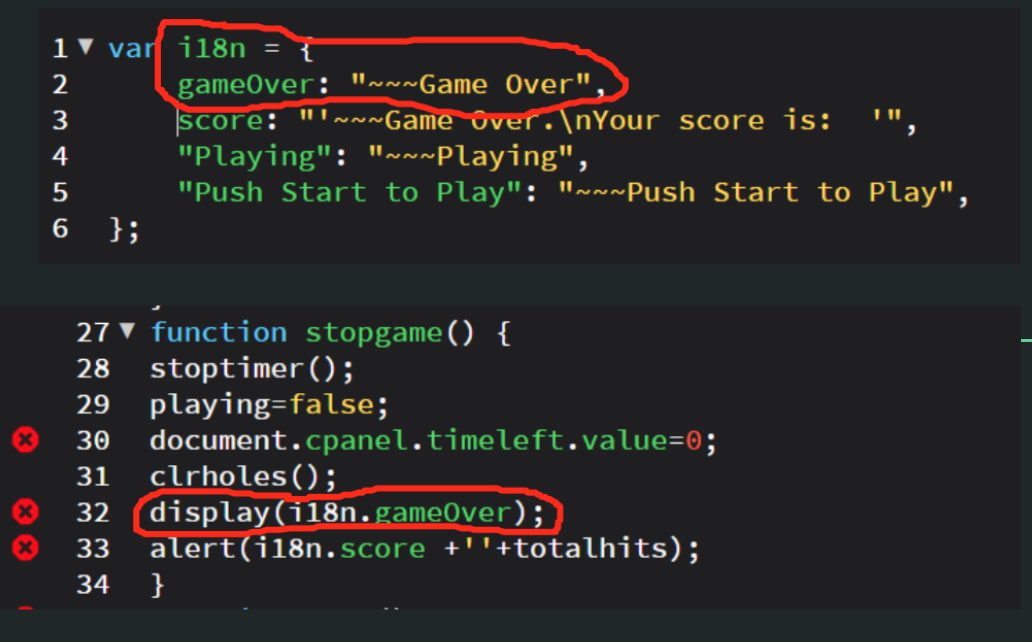
Upon discovering the strings.xml file for this project, I noticed that the app had already been localized into various languages. Fortunately, this meant instead of using hardcoded strings, this developer defined each string as a key value pair in the strings.xml file. I located the localized files by entering the resource directory for the project (see below).

Value Resource Directories and their Locale Qualifiers

When you right click on the values resource directory, you have the option to create a new values resource file. Assuming this project didn’t have any resource directories for other locales, I would create one and select a Locale from the list of qualifiers and move it into the Chosen qualifiers section by pressing the >> button in the middle of the window (see below).

Once there is a new values directory, you can right click it and create a strings.xml file for your desired locale. Since Omni-Notes was lacking a Vietnamese directory, I created one using the following steps.

Creating Omni-Notes in VietnameseFirst Steps

For Omni-Notes, there were two file types that I needed to localize into Vietnamese: a strings.xml file and an arrays.xml file. The biggest difference between these two file types was that the arrays.xml file contained something called a drawable. According to the Android developer website, “when you need to display static images in your app, you can use the Drawable class and its subclasses to draw shapes and images.” Given that these images were mostly universal in nature, they did not need to be localized.

For those without a CAT tool, Android does have a built-in way to translate strings called Translations Editor.

Because I have access to Memsource, using the Translation Editor would be inefficient because the translations would all have to be done manually. Using Memsource, I uploaded both the default strings.xml and arrays.xml file (English file) and used MT to translate them into Vietnamese. After downloading the completed files, I dragged them into the Vietnamese resource directory that I had created, and then I built the app again.

Takeaways

All in all, localizing in Android Studio was a manageable process. In large part, this was due to the fact that many of the strings were not hard coded and were all stored in the arrays and strings.xml files. With enough repetition, localizing in Android Studio should become easier and easier.

Watch a Video of the Fully Localized Vietnamese Omni-Notes

BART or 舊金山灣區捷運系統?

Growing up in San Francisco, seeing public transportation signs in multiple languages is commonplace. Take the example below.

I never paid much mind to these type of signs. San Francisco was home. Getting from point A to point B required little to no thinking. Whether it be the 67, 49, or 24, it made no difference to me. Bus numbers were merely numerical representations of their destinations – Bernal Heights, the Mission, and Divis.

However, something changed. I moved to Taiwan and learned Chinese.

For three years I toiled attempting to make my way out of the labyrinth that is Chinese. My reward? Being able to read Chinese on public transportation signs! What could be more exhilarating than reading your bus has moved locations because of a parade?

Whether it be on the bus or waiting at the bus stop, there were numerous chances to practice my Chinese. Yet, something was missing…

There were no maps in Chinese! And from this my DTP project was birthed.

Photoshop or InDesign?

My first task was to find the content I would localize. Originally, I was between localizing the Muni Metro Map and the Bay Area Rapid Transit Map (BART).

I decided to go with the BART map because it has stops at both the San Francisco and Oakland International Airports and thus would be exposed to more Chinese speakers. Now how would I localize it into Chinese? I knew that I could either use Adobe Photoshop or Adobe InDesign. Seeing that my project would predominantly involve text formatting between languages, I knew InDesign would be the wisest choice. This is because InDesign is supported by most CAT tools. Going with Photoshop would require the creation of a picture list and thus lengthen the time needed for localization.

Once I made my decision to use InDesign, I found a PDF version of the BART map and then it was converted to an INDD file by my professor.

Simplified Chinese or Traditional Chinese?

The Chinese characters seen in San Francisco’s Chinatown, and all American Chinatowns for that matter, are Traditional Chinese characters. There are two reasons for this:

  1.  Simplified Chinese characters were standardized in the Mainland in the 1950s. Chinese immigrants started coming to the US in the early 1800s and at that time Chinese predominantly used Traditional characters.
  2. Up until the past few decades, most Chinese immigrants to the US came from Hong Kong or Taiwan. Both of these regions use Traditional Chinese characters. 

From this perspective, it would make sense for me to localize using Traditional Characters. However, there’s no denying the influx of tourists coming from Mainland China – a country that solely uses Simplified Chinese. In reality, I would seek clarification from BART as to which type of Chinese characters should be used. Since this a fictional project, and I lived in Taiwan, I decided to go with Traditional characters.

Time to localize!

Clean up

Before beginning the translation, a clean up of the INDD file was in order. Fortunately, the conversion from PDF to INDD went smoothly. However, there were some issues that I needed to touch up before uploading the file to a CAT tool. Specifically, many of the text frames included multiple lines of text. As this is a map with train stations, this could cause confusion for the translator. If the translator were to upload the INDD file as is, they would see multiple train station names within one segment in their CAT tool.

Aside from the issue with multiple stations within one text frame, I needed to address issues regarding the overall formatting of the text frames.

As you can see the individual letters for the trains were all clumped together in one text frame. There also were the name of two train stops in the text frame as well. Formatting the letters to match the picture on the right would be a nightmare. In order to overcome this formatting issue, I created individual text frames for each letter and each train stop.

typeface

When originally opening up the INDD file, a notification appeared informing me that the file contained fonts that were currently unavailable. It did not mention what the original typeface was, so I did some research online and found an article titled: “Why the Same Three Typefaces Are Used In Almost Every Airport.” Among the typefaces mentioned was one called “Frutiger.” It looked very similar to the one found in the BART map. I then searched “Frutiger” and “BART map” together and it led me to a blog of a transit planner for Muni. There, I found a BART map recreated by him, along with the following sentence: “Along with other elements of the BART brand, this map features its official typeface: Frutiger.” Bingo! Frutiger!

The issue then was seeing if this typeface worked with Chinese characters. In short, it didn’t. As an alternative, I replaced all the Times New Roman (default typeface) with Frutiger to see its different font weights. There were just two – Regular and Bold. Looking in the Chinese typefaces, I did my best to find something that matched closely with Frutiger and offered different weights. I settled with PingFang HK. 

TRANSlation

Once creating text boxes for all the individual stops and other information on the map, I was ready to translate using a CAT tool. I used Memsource to carry out the translation. Not being a native speaker of Chinese, I used MT with post-editing and then had a native speaker check my work. I was originally worried about the translations of the cities, but I found a BART information guide in Chinese that included the names of all cities in Chinese (click here to see the guide). The great thing about Chinese is that there is minimal text expansion. While some of the names of the cities did expand, it never compromised the overall format of the map.

typeface ambiguity

Given that the localized BART map would include both English and Chinese – I wouldn’t be translating proper nouns into Chinese – I wasn’t sure if I needed the English to use PingFang HK as well. Most likely, I would have to ask the client if they’d want conformity throughout the map, or would a combination of Frutiger for English and PingFang HK for Chinese be ok. I went with the latter option.

Frutiger + PingFangHK

Going with two fonts led to some slight formatting issues. Specifically, the numbers for the train stops did not line up well. I rectified this by adjusting the kerning.

Final Thoughts

Overall, localizing the BART map into Chinese was a smooth process. This was due in large part to the pre-translation work that I did from the onset of the project. Once the formatting and text frames were all where they needed to be, it was just a matter of completing the translation and pasting the Chinese into the target language INDD file. In the future, BART could use this file as a template for other languages.

Lessons learned
  • Pre-translation cleanup is crucial!
  • Clarify font issues with the client ASAP
  • Spend some time researching the market you’re localizing for
  • Using InDesign to localize is fun!

Deliverables

Click here to see the PDF of the English BART map

Click here to see the PDF of the localized Traditional Chinese BART map

Group TMS Consulting Project

Towards the end of the semester we had the opportunity to hear from the CTO of a web based TMS. Apart from giving us a thorough introduction into the various functionalities found within their TMS, the CTO also encouraged us to share any feedback on ways to improve the TMS. While similar to the TMS comparison project done earlier in the year, this time we had a real life client come to us seeking our insights.

Consulting 101

First we would need to confirm the needs of the client, research possible solutions, and professionally present our recommendations to the client. With my group, we discussed the common features and functionalities that TMS systems have, and which of those could be beneficial to our client’s TMS. Or, if said client’s TMS already had those functionalities, how can they be further improved.

The areas for improvement/enhancement that my team came up with for our client. The area I covered was personalization.

Personalization

Having worked with SDL WorldServer, GlobalLink, and Lingotek, all three TMS systems provide some sort of customization ability. This was most apparent with workflows. Workflows are key to operational efficiency. Being able to customize a workflow lets the PM choose the type of translation and a review process that closely matches the content being translated. During my review of the client’s TMS, I noticed there wasn’t any way to customize workflows. The user selects a document type (four to choose from) and only one workflow appears for those four documents.

One workflow for four document types

I would advocate for the client’s TMS to allow for customization of the project workflow. Being able to customize a workflow would let the PM choose the type of translation and a review process that closely matches the content being translated. Certain clients may have projects that use workflows with minimal steps. For example, a workflow for machine translation may not require several rounds of review. It could just be a machine translation with PEMT.

Additionally, it would be beneficial to allow for the customization of document types. Allowing PMs to customize the document type to better represent the types of documents they receive from their clients. There may be niche areas that have different rates, such as as business or website translation.

Being able to personalize a TMS will increase efficiency, ensure maximum optimization of resources, and cut down unwarranted wastage.

How to prepare selecting your first Translation Management System

Per the Global and Localization Association (GALA), Translation Management System (TMS) “automates the translation process, makes it more controllable, and eliminates repetitive tasks.” TMS offers functionality in process automation, language automation, and business automation. This semester in groups we were tasked with comparing two TMS systems – SDL WorldServer and GlobalLink. Through the course of this project I gained greater insight into what needs to considered when selecting a TMS.

How do you even select a TMS?

Selecting a TMS encompasses a myriad of factors, whether it be stakeholders or budget, there is a lot to consider. The key is to not get overwhelmed with the finer details. There first should be a general understanding of what your needs are and how those needs affect different stakeholders. I recommend using RWS Moravia’s “Six Steps to Choosing the Right Translation Management System” to kick-off this process. (Click here to see the Moravia article)

They listed the following six steps to help choose the right TMS:

  • Identify all the stakeholders
  • Gather stakeholder requirements
  • Sort requirements by functional areas
  • Sort ‘must-haves’ from ‘nice-to-haves’
  • Requests demos*
  • Evaluate, pilot, go!

Before going through the six steps, my group decided we would be using the perspective of a new small-sized LSP looking to purchase their first TMS.

Stakeholders

  • Translators/Reviewers (T/R)
  • Engineers (E)
  • DTP
  • PM
  • Sales (S)
  • Vendor Management (VM)
  • Upper Management (UP)

Stakeholder Requirements (‘must-haves’ & ‘nice-to-haves’)

These requirements were broken down by being Useful (U), Important (I), and Critical (C) and linked to their respective stakeholders.

Functional Areas

From there we divided these requirements between four categories: 1) Linguistic (Linguists), 2) Technical (Engineer), Workflow Management (PM), Business Management (Upper Management).

Understanding what the critical and important needs were key to us being able to properly analyze SDL WorldServer and GlobalLink.

Evaluate, pilot, go!

Each member of our group took time to review the two TMS systems against our stakeholder requirements. While we didn’t have a specific pilot project in mind, we agreed that creating a project within SDL WorldServer and GlobalLink could be the basis for our evaluation.

These our the scores that were compiled after each member of our group reviewed the respective TMS systems. We used a scoring system of 1-5, with 1 being the lowest score and 5 being the highest score.

After calculating the averages via Excel, the averages of our scores were placed within the Critical, Important, and Useful categories.

Who won?

In the end, there wasn’t a significant difference between SDL World Server and GlobalLink. There was a slight difference in the Critical Sum, but nothing that would impede our fictional LSP from selecting one TMS system over the other. In order to solidify the best choice, best practice would be to run distinct translation projects that could shed more light on each TMS systems strengths and weaknesses.

Click here here to see our final presentation and a more in depth analysis of the differences between SDL WorldServer and GlobalLink.

CAT Tool and Non-CAT Tool Musings

Finding ways to automate the localization process can come in various forms. Be it a new tool or feature within a CAT tool, finding that new thing to add to your automation arsenal could potentially save you time and money. One question that I continued to ask myself over the course of this semester was: “How can this be automated?”

Tips for Trados QA (using Regex)

Trados has a labyrinth of features that can be deployed to automate the localization process. The issue is visualizing how these features can be applied to your specific workflow, language locale, and content. One such feature that is worth looking into is regular expression (regex). Regex is a special text string for describing a search pattern. Here are some examples of how regex in tandem with Trados can enhance the localization process:

  • Regex can search for a pattern, like a web address, a date, a combination of number and measurement
  • Changing date formats or the sequence of elements
  • Use regex in the QA checkers to find specific things, like numbers and measurement units that are not separated by a non-breaking space

Using Trados, I sought to test these enhancements with English and Chinese.

Commas and Periods for Chinese

In the QA checker I added [.,] in the RegEx target field to detect for non-Chinese commas and periods. When the translator runs the QA verification, any non-Chinese commas and periods will show up in the target field as a warning. These can then be replaced using the same regular expression in the “Find what” field as shown in the screenshot above.  

Time

In Chinese, time is typically expressed using a 24-hour clock. The QA checker will now detect for any expressions of time that follow the AM/PM format in the source, and then compare these to the target. If target and source match (meaning time is expressed using AM/PM in Chinese rather than converting time to a 24-hour clock format), this will be marked as a potential error in translation.

“The best defense is a good offense.” Using regex to preempt potential issues that may arise during translation will save a lot unneeded repair work and streamline the localization process.

Utility Demo/Training Video

Apart from CAT tools, what other methods are out there waiting to be tapped into by unsuspecting PMs? I took the liberty to dig deeper into one whose presence has become hard to ignore – Monday.com. On their website they claim to be “a tool that simplifies the way teams work together – Manage workload, track projects, move work forward, communicate with people.” Assuming the role of a PM, I sought to explore how Monday.com could be effective in automating the life of a localization project.

Click here to watch my review

Let’s Train TED with SMT

Overview

This semester I dove deeper into the world of Computer-Assisted Translation (CAT). Building upon the general foundation I established during my first semester, this course provided the platform to gain greater insight into the different tools used by today’s language professionals.

Having been exposed to a wide range of CAT tools such as SDL Trados, Memsource, and memoQ, there is no question that CAT tools streamline the translation process and lower its associated costs. This coupled with ever-improving machine translation (MT) and the possibilities for an even faster translation process are undeniable. However, MT has not reached a point where it can be the sole form of translation, largely due to its inaccuracies vis-à-vis the nuances of human language.

Understanding the strengths of MT also requires one to understand its limitations. For one, there are several forms of MT: there is Rule-Based Machine Translation (RBMT), Statistical Machine Translation (SMT), Hybrid Machine Translation (HMT), and Neural Machine Translation (NMT). This semester I had the opportunity to work on a team with the goal of building a SMT engine. We learned first-hand the process and thinking needed to train our own SMT engine.

To train or not to train?

For starters how does SMT work? SMT uses statistical models that are based on the analysis of large volumes of bilingual text. Using these large volumes of bilingual text, it attempts to find correspondence between a word from the source language and a word from the target language. Depending on the subject matter text that is used to train the engine, the SMT is most suited for documents pertaining to the same subject.

In our first group meeting we brainstormed possible subjects and styles of documents that our SMT engine would translate. Given that we’d be using Microsoft CustomTranslator to build our SMT engine, we referred to the Microsoft Translator User Guide in helping us best determine how to select a topic. It stated the following:

“If your project is domain (category) specific, your documents, both parallel and monolingual, should be consistent in terminology with that category. The quality of the resulting translation system depends on the number of sentences in your document set and the quality of the sentences. “

We decided that TED talks provided us ample material that would be consistent in terminology among our source and target language. Below is our project overview.

Let the training begin!

In order to effectively manage our time and roles we came up with the following process steps:

The goal of this project was to meet the following criteria:

  • Efficiency: PEMT roughly 30% faster than human translation.
  • Cost:  PEMT roughly 27.5% lower than human translation
  • Quality:No critical errors in any category, no major errors for accuracy, fluency and terminology, and total score <= 15 per 1,000 words.

Images above display our quality metrics

As previously mentioned, MT is not infallible and thus requires editing, hence the PEMT (Post-Editing Machine Translation) shown within our Efficiency and Cost criteria. Apart from our own criteria, our training produced BLEU scores (Bilingual Evaluation Study). The BLEU score basically measures the difference between human and machine translation output. While a low BLEU score may indicate poor output quality (MT output vs. human ), it does provide a mechanism for improving the overall output (if the BLEU score increases over rounds of training).

Is TED worth training?

The short answer is no. Speeches are inherently filled with an array of lexical minefields, and the TED talks we used to build our corpora were no different. Simply put, SMT is not built for the translation of speeches. That being said, we did make interesting findings regarding our training, tuning, and testing data.

Data cleaning before training and tuning

The Microsoft Translator Hub User Guide states “a sentence length of 8 to 18 words will produce the best results,” more than half our tuning data sentences were under 8 words and over 18 words. We believed shortening the sentence length in a new set of tuning data (500 words) would rectify this issue, however, the opposite occurred – our BLEU score dropped by 1.04.

Why?
  • The general sentence length of the new tuning data set was too different from that of the previous training and tuning data
  • Conclusion: Train with short sentences in the beginning and tune with short sentences!
Testing

The challenging nature of EN/ZH translation

Translating from English to Chinese is HARD. This especially true when dealing with speeches where language isn’t confined to structured or predicable patterns. The biggest drawback of SMT is that it does not factor in context, which is crucial to making sense of the TED talks we used. As you can see from our BLEU scores, significant improvements to our score were few and far between (see below). We conducted nine rounds of training and were unable to surpass or match our original BLEU score.

Conclusions

If you’re aiming for high-quality translations, be prepared to invest time and money training a SMT engine. SMT require a very large bilingual corpora. Not only does it need to be large, but also high-quality. Using low-quality data to train your engine will only lead to disappointment. While this project has reinforced my belief that SMT shouldn’t be used to translate speeches, I am not completely against the use of SMT with PEMT.

This is because after nine rounds of training and editing the raw MT output from our SMT, there is enough evidence to suggest PEMT could be 30% faster than human translation and 27.5% cheaper. Where we erred during our project, was creating quality metrics specific to the raw MT output and not the PEMT itself. While all our raw MT output failed to meet the standards designated by our quality metrics, it was never incomprehensible. Quality metrics designed around PEMT would better determine the amount of post-editing needed; the fewer post-edits there are the better. I could envision a scenario in which TED Talks uses SMT to mass translate all its content into other languages. Thereupon, translators could take the raw MT output and edit it to a level TED Talks deems fit.

Ultimately, training a useful SMT engine requires time to achieve good results. The key is to use time in a manner that aligns with what SMT is effective at. In order to do this, you need to ask yourself what is it that you want to translate and the translation quality that you desire to achieve.

Click here to see the slides from my group’s final presentation.

Is a Talent Management Office Necessary?

Context for Talent Management

Localization is a constantly evolving industry and what works right now may not work five years from now. Given this landscape, how Language Service Providers (LSP) are able to adapt to the potential changes will largely depend on the talent at their disposal. LSPs that continue to rely on the same talent for all projects will be less prepared to handle a more responsive localization process. Furthermore, there’s no guarantee that the same talent pool is capable of adapting to the developments in the industry.  The flip side to this is that there are several costs to on boarding new talent, so there may be a tendency to adhere to the “if it ain’t broke, don’t fix it” mindset.  From the perspective of an LSP that has a smaller budget and not intent on expanding, this makes sense. However, LSPs aiming to change their culture, reduce talent mismanagement, and diversify their talent pool,  should consider creating a Talent Management Office (TMO).

In order to get this process started I recommend answering the following questions found within the book titled “Vendor Management” written by Agostino Carrideo:

  • What are the current challenges with vendor relationships?
  • Who performs vendor risk and performance reviews?
  • Who sets up vendors in the company’s database or servicing?
  • How does each line of business handle vendors?

Succinctly answering these questions will shed light on whether or not establishing a TMO is a worthy investment.

Core Function of the Talent Management Office

One of the most crucial parts of any new project taken on by an LSP is the deadline, so it only makes sense that when a project manager (PM) receives a new project, he or she aims to start it ASAP.  How does the PM manage this? Most likely they give a new project to a preferred vendor, as they know their working style and can trust them.  On the one hand this allows projects to begin promptly, however, on the other, the growth of the LSP’s client pool will stagnate. This could prove to have significant consequences if the LSP tries to take on projects that are bigger or require greater specialization.

Having a talent manager would allow the PM to focus solely on projects while also creating a position dedicated to fulfilling the demand of increasing language needs. The person who takes up this position also needs to qualified; they will be navigating the risks inherent in recruiting in an online environment, including translator scammers and inexperienced providers misrepresenting their capabilities.  The essential duties of the talent manager may include the following: 

  • Recruit in new and existing language pairs as necessary through translator directories, including the ATA directory, Proz, and regional translation association directories, identifying partners that meet minimum talent requirements
  • Collect documentation to verify that translators meet minimum talent requirements, and verify translator contact information
  • Maintain LSP’s master rolodex of global translation partners with up-to-date information on translation providers, their location, experience, rates, technology, etc. as collected in required documentation; record continuing education efforts
  • Pass translators who meet minimum talent requirements through testing, including internal and native-language reviews
  • Review translation test deliverables for completeness, accuracy, consistency and stylistics, and put steps in place to correct any non-conforming product
  • Maintain LSP’s talent testing tracker and the list of approved translation talent with up-to-date information on testing status of partners; maintain LSP’s approved providers chart with up-to-date information on approved translators
  • Negotiate on rates, payment terms, etc.
  • Train new providers in LSP processes and technology, and transition providers to new processes/technology as necessary

As made apparent by this list, in order to create long-lasting relationships with a global network of highly-qualified translators, talent managers need excellent communication and negotiation skills.

To Build or Not to Build

Is building a TMO necessary? Answering this question depends on the type of LSP you’re aiming to become. There’s no doubt that implementing a TMO will help in the five following areas:

  1. Safeguard your company’s reputation
  2. Lower risks
  3. Increase efficiency
  4. Reduce future costs as company grow
  5. Create and strengthen talent-company relationship

Talent is essential to any LSPs success and managing the talent efficiently requires strategic planning. If establishing and running a TMO wasn’t such a complex process involving various moving parts, it would be standard practice. Ultimately, there may be a strong case for devoting specific resources to a TMO as the volume of talent, contracts, projects, languages and potentially geographical coverage expand.


Trados Translation Project

In our Intro to Computer Assisted Translation (CAT) course we’ve had hands on practice creating translation memory, managing terminology, reusing previous translations, and editing translations.

Our final project gave us the opportunity to simulate the experience of translating in a small, in-house translation team or in a small group of associated freelancers. Using SDL Trados Studio, my team was tasked with providing the following CAT Project Files to a client of our choice:

  • Proposal/SOW
  • Deliverables

Proposal/SOW:

Our client, the Chengdu Tourist Bureau, requested we translate one of their Chinese blog posts into English.  Our proposal would be used to outline the major goals and scope of the project. For example, costs, resources required, outline of preparation, production and finalization phases, etc. In short, the proposal will ensure that the client understands our workflow and that the project’s specifications are understood by all parties.

Deliverables:

The deliverables are what will  ultimately be given to the client at the conclusion of the project.

For this project, they were as follows:

Source

  • The original source text (English)

Target

  • The translated target text (Chinese)

Translation Memory (TM)

  • Creation of a new TM for the client

Glossary

  • Creation of a glossary for the client containing terms relevant to the source text

Pseudo Translation 

  • Used to resolve localization issues before they take place


Click here to see the deliverables for this project.

Finals Thoughts 

After completing this project I feel confident knowing which are the appropriate uses for CAT tools. Furthermore, this project gave me hands on experience with the different components of Trados. If in the future there is a need to learn a new CAT tool, I know can do it on my own.

Presentation of Lessons Learned

Here is a video of my team describing the lessons we learned during this project.


Localization Project Management Office

The image above represents the workflow of the Localization Project Management Office that I and four other colleagues built together over 15 weeks.  At first glance, one may ask how we needed 15 weeks to compile what looks like a basic workflow checklist, but in reality this workflow will determine the type of LPM office we want to be.

There are three reasons why this is true:

  1. Our project managers (PMs) will be managing multiple projects simultaneously and they need really good checklists and documented work structures to ensure that nothing falls through the cracks.
  2. An effective workflow will help reduce our PMs stress and assist them in learning their job faster.
  3. A clear workflow will aid the client in learning to speak our language. This is crucial to establishing and maintaining a healthy client relationship. 

As my team was new to Localization Project Management (LPM), it took 15 weeks of confusion, frustration, success, and collaboration for us to obtain and understand the insights mentioned above.

This process was complicated by two things. The first, our course syllabus stated the following:

“Obviously not all translation and localization projects are alike, so students will be asked to think outside the box for novel solutions to potentially complex project requirements.”

Being a first-year student, my understanding to what extent and how projects would differentiate was non-existent.

Second,  this is an image of a basic localization production workflow that was shown in our second week of class.

I remember thinking to myself: “This is a basic workflow???” Being able to visualize the different stages in this image was nearly impossible.

At the same time,  seeing this image I knew my team would have to create an LPM Office capable of maintaining consistent high quality standards that would be carried out through all stages of the localization workflow.

In order to shed light on how my team executed this, I will focus on the following areas:

  • Establishing team identity
  • Managing expectations
  • Strategies for project planning and monitoring
Establishing Team Identity

In one of our first meetings, I remember thinking it’s imperative our group avoid dividing up the work without any proper discussion as to what is being divided. For example, in the Translation, Editing, and Proofreading phase (TEP), we would want to avoid designating someone to write out our Translation checklist without discussing as a group what were the goals for said checklist.  I realize that there may be times where ample discussion must be curtailed for the sake of delivering the project on time. However, given that this was a project, I found it imperative that everyone not only understand what we were doing, but why we were doing it.  For one, this would help build accountability, not in the sense of blame, but rather that every team member would be accountable for finding ways to improve our workflow. Secondly, understanding why we’re doing what we do, allows us to adjust our actual thought process vis-a-vis our workflow.

Lastly, I wanted to create an environment in which every phase of building our workflow was a new opportunity to learn about how to think.

Managing Expectations

In one of our earlier class discussions, our professor brought up the term “critical path,” or the “path of least resistance.” That is, having a workflow where everything is moving forward. This proved to be difficult, primarily because it was hard reconciling identifying what is critical to a successful localization workflow with weeding out what was unimportant. There was no reference experience any of us could turn to to save us from getting bogged down in over analyzing every nitty-gritty detail. We determined that meeting once a week and outlining the goals of each week’s assignment would allows us to focus on achieving the right results.

Strategies for Project Planning and Monitoring

One piece of advice I would give my team if starting this project again, would be implementing consistent naming standardization for files from the very onset of the project.  In hindsight having standardization is quite obvious, but I cannot stress this enough. Proper naming of files saves time, keeps the deliverables moving forward, and reflects well on the professionalism of our LMP office.

Final Thoughts

After finishing this project, I can now visualize the various steps that make up basic localization production workflow image above. However, this is merely the beginning of my journey in localization, the next step is to take the lessons I’ve learned during this project and link them to future actions.


JavaScript Game Internationalization

Over the course of this semester we had the opportunity to imagine website localization through various perspectives: as a project manager within a company, a program manager within an agency, a localization engineer within an agency, and as a translator. Needless to say, they all posed their unique challenges and required critical thinking skills.

In week seven we were introduced to internationalization (i18n). As we learned in class, during software development, i18n is the phase used to determine if a software application can support multiple languages. In order to achieve this, all hard-coded user-facing strings must be removed from within the program code. From there, these strings will be moved to an easily-translatable file (string translation).

The assignment during this week required the implementation of “24 Ways” to internationalize a game called “Bunny Hunt.” This by far was the most challenging assignment of the semester. As such, I decided to use the final project to further explore game internationalization.

Given the complications that can occur when pulling strings, my partner and I agreed to find a JavaScript game that did not an overwhelming amount of strings. We found a simple game on http://www.jsmadeeasy.com/ and would translate it into Chinese. The next step would be implementing the 24 Ways i18n method:

  1. Add the internationalization function and save it as 24Ways.js
  2. Add the JS file name to our HTML file
  3. Externalize strings (or wrapping the strings)
  4. Create strings file
  5. Translate strings

As there are many different steps within this process, I will highlight the issues we encountered and how we resolved them.

1) Adding the internationalization function and the JS file name to our HTML file

Following step one, we created a 24Ways.js file. We also created a Strings_zh-cn.js file for our Chinese translations. Prior to preparing the strings for translation, we needed to add the JS files to our HTML file for the Chinese version of the game.  Here we ran into our first issue.

The HTML file could not find our JS files because we directed it to the wrong files. Specifically, we forgot to put a backslash after the periods in “src=”..js/” and “src=”..lang/” and thus was looking for files in the “zh_cn” folder and not the “js” and “lang” files. Once we added the backslash, the issue was resolved.

2) Externalizing Strings

During this stage we wanted to ensure that the way we wrapped the strings was correctly done, hence the “~~~” before the text. Here, we ran into an issue regarding how we wrapped the strings.

When wrapping segment 33, we left the original single quote, but that cause the string not to render properly in the game. Upon removing the single quote, the “~~~” appeared in the game.

Here is what the correct string formatting looked like in our strings_zh-cn.js file. The single quote has been removed.

3) Issues with the original game files

When we originally opened the original game files in our open source code editor – Brackets – we noticed there wasn’t a game.js file. The JavaScript for the game was coded into the HTML (segment 8).

In order to avoid confusion, we determined to move the <script> portion found in the HTML and create a game.js file.

4) Alternate solution to 24 Ways

The issues we encountered while implementing 24 Ways took us several hours to figure out. At one point, we contemplated abandoning it all together and using an alternate solution. Specifically, given that the game only has a few strings, we could make objects for the strings and pass the objects in the JS through the i18 variable. See below.

This proved to work, but we realized this isn’t a feasible solution when internationalizing a game with a vast number of strings.

Final Thoughts

This project proved to be as challenging as the original assignment involving JavaScript internationalization. However, the opportunity to redo and go through the different steps of 24 Ways helped refine my own understanding of the issues that face software developers when internationalizing. Projects like these are great learning experiences and will minimize future frustrations encountered in JavaScript game internationalization.


Sites DOT MIISThe Middlebury Institute site network.