Author: Jie Zhao

Leadership and Failure

Leadership is a very important skill for us to learn so that we can be ready when we need to step up in our future career. That’s why my team and I did a research project on leadership with the hope that this could contribute to a future class for the students in our program. We made a questionnaire to get insights from leaders in our industry, did a comparative analysis of university courses and online courses, and ran a survey among students. Below is a screenshot of the survey results.

Survey Results

From the results, you can see that the most popular topic students want to learn is dealing with failure, which is also an area I’m very interested in. So I did some research on this topic to explore how leaders handle failure and how we can better prepare ourselves to deal with failure with the mindset of a leader.

Source: GETTY IMAGES/ISTOCKPHOTO

Failure Makes You a Better Leader

First, you need to understand that failure can actually make you a better leader. Instead of trying to avoid failure, you should embrace it. It’s not easy, but sometimes you have to take the necessary risks to achieve success, even if those risks might lead to failure, because

Failure teaches wisdom

Success makes you feel good, but you can’t really learn anything from it. Sometimes you don’t even know how you succeeded. Maybe it’s pure luck. Failure, on the other hand, might make you feel down or disappointed for a few days, but ultimately gives you wisdom and growth. From failures, leaders develop a deep understanding that success rarely happens from the first try.

Failure breeds resiliency.

Failure is the best way to make you resilient. Persistence and resilience come from experiencing one failure after another and still having the will to keep trying. Leaders are leaders because they don’t give up until they succeed and they don’t let anything discourage them from doing that.

Failure stretches potential.

We all think that there’s a limit to what we can do, but for leaders, that limit is for them to break. They are constantly taking on new responsibilities in new territories, so they have to learn to teach themselves new knowledge when needed.

Failure provides opportunities.

We are all predisposed to avoid failure, because no one wants to experience frustration and defeat, but if you don’t step out of your comfort zone, you won’t have the opportunities to grow and your potential will be limited. Leaders always see failures as opportunities. They take advantage of the additional resources and preparation they got from their failures and use them to succeed.

Failure supplies motivation.

Nothing is more motivating than failure. If you succeed, you won’t feel the urge to continue your quest. However, if you fail, you will be determined to try again until you succeed. Leaders are especially motivated by failure because they can concentrate harder, focus better and achieve more next time.

Source: PranThira / Shutterstock

Lead Yourself out of Failure

Great leaders hold themselves accountable for their failures. That’s why they can persevere, become better and build legacies, so how can you lead yourself out of failure and become one of them? Here are some tips you can use when dealing with failure.

Confront your failure and learn from it

As a leader, you have to face your failure head-on. There should be a postmortem after each failure where you evaluate what you could’ve done better and identify the lessons learned. While the memory is still fresh on your mind, create an action plan so you don’t make the same mistakes next time.

Build your team and make the environment better

Sometimes, leaders fail because they don’t build a good relationship with their team. No one works in a bubble, especially leaders. In order to succeed, you have to create an environment where everyone can trust and depend on each other. This way, even if you fail, you know that your team will have your back and you’ll overcome the failure together.

Trust your gut and make more decisions

More often than not, risks are necessary to success. Leaders have to take risks all the time because it’s impossible for them to know everything. Don’t let failure discourage you from making decisions. Sometimes, you just need to trust yourself because you’ve done your research and preparation.

Second chances are all around you

People tend to panic when they fail, but there’s absolutely no need for that. Leaders can identify opportunities around failure with broader observation. They can seize those opportunities and use them to overcome adversity and achieve success.

Navigate your leadership responsibilities

Leaders have broad responsibilities. What they do impact others. You need to always think about how your decisions and actions can affect others. Also, you need to learn to delegate. Being a leader doesn’t mean you have to do everything on your own. Delegating tasks to your team can help them grow and become leaders themselves in the future.

To be a great leader, you have to be comfortable with failure. Things go wrong all the time. Don’t let it discourage you. See failures as opportunities, rather than setbacks. Use them to your advantage and you will succeed!

Kudos to my colleagues Peter Chea, Jacobsen Miller, and Tianlin Li for always being so efficient and on top of everything. If you want to learn more about our project, please check out their posts:

Leadership Research Project

Leadership and Risk Taking

Followership

Sources

This is Why Failure Makes You a Better Leader

5 Things Failure Teaches You About Leadership

Unity Game Localization

In game development, Unity is one of the most common and powerful tools. It allows game designers to focus on creating the game, rather than programming. Therefore, in game localization, Unity is also a must-learn tool.

Recently, I found a very interesting game on UnityList and I decided to localize it into Simplified Chinese so that Chinese players can play it too. Here’s how I localized the game.

Game Evaluation

After I downloaded the asset from UnityList, I ran it in Unity to evaluate the game and identify the strings. Unfortunately, I couldn’t get very far because the game was really hard. Nevertheless, from the few levels I was able to get through, I found on-screen instructions so I proceeded to locate those strings.

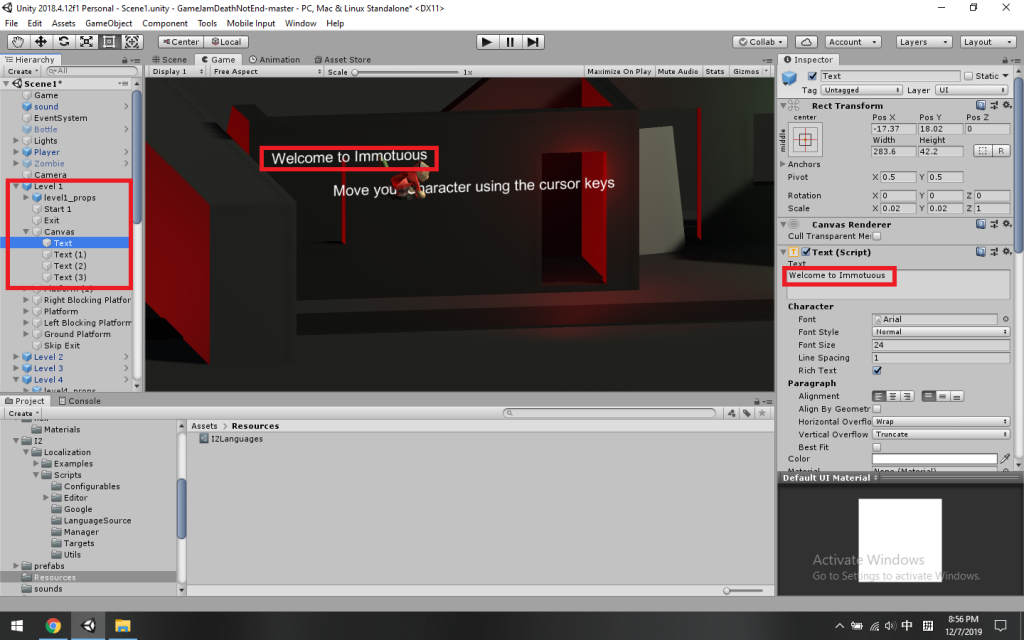
To my surprise, they were not easy to find. In the games I localized before, strings were usually located in the script files, but I looked through every one of them and found nothing. Then I noticed “Scene 1” was expanded in the navigation panel with all the levels in it, so I went into each one of them and found all the strings there under “Canvas”. Then I realized the strings in this game were not in the code, but in the UI text elements. This actually makes them a lot easier to localize because they don’t need to be internationalized. If the strings are in the code, then they have to be internationalized so that the texts can be extracted from the code to be localized. For text elements, you can localize them directly in Unity.

UI text element

I2 Localization

Right now, the most complete localization solution for Unity is I2 localization which was what I used to localize this game.

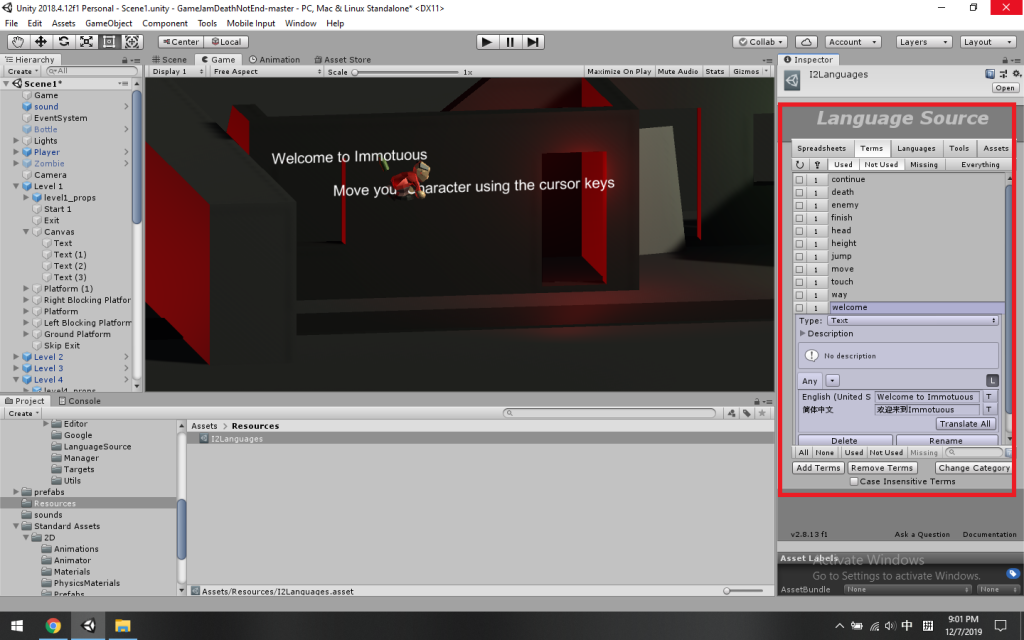
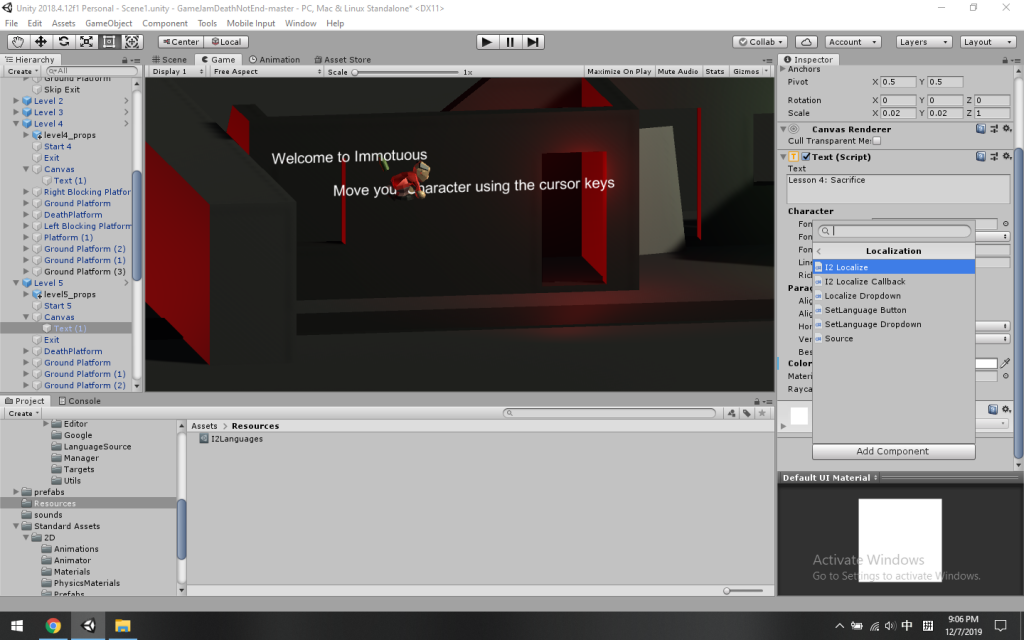
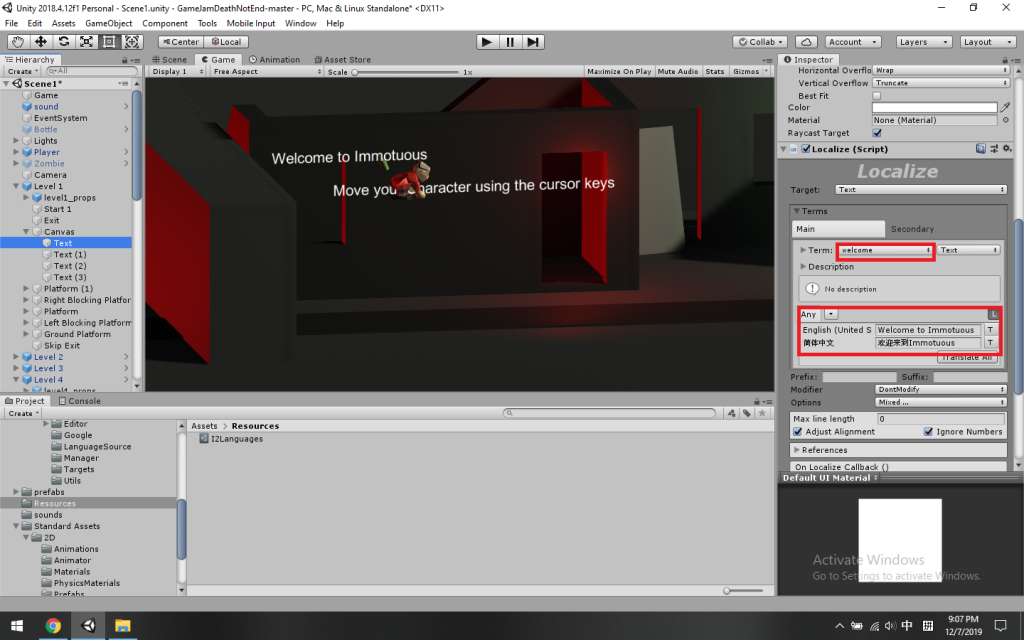
First, I imported the I2 localization package by going to Assets → Import Package → Custom Package. Then I went into “Resources” and found the “I2Language” asset where I can add languages, keys and terms. I added English and Chinese for the languages and the first key “welcome”. For the terms, I copied the English text from the text element and translated it into Chinese. I did the same with the rest of the strings. After that, I connected the text elements with the keys. I did that by going into each text element, adding a component called “I2 Localize” and then choosing the key that matched with the string from there.

Languages
Keys and terms
I2 Localize
Connect text elements with keys

Language Switcher

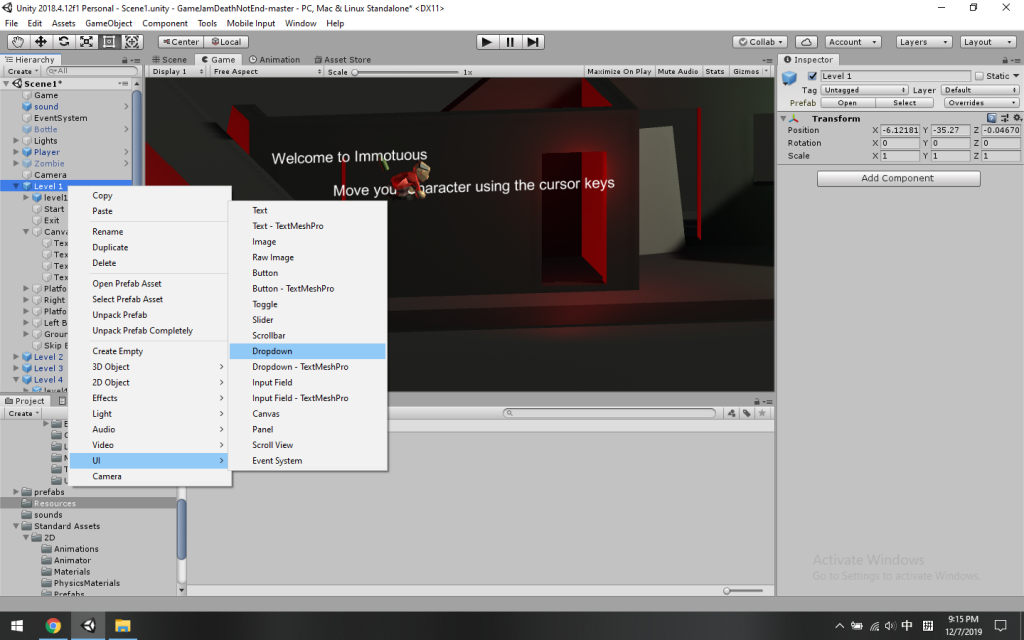
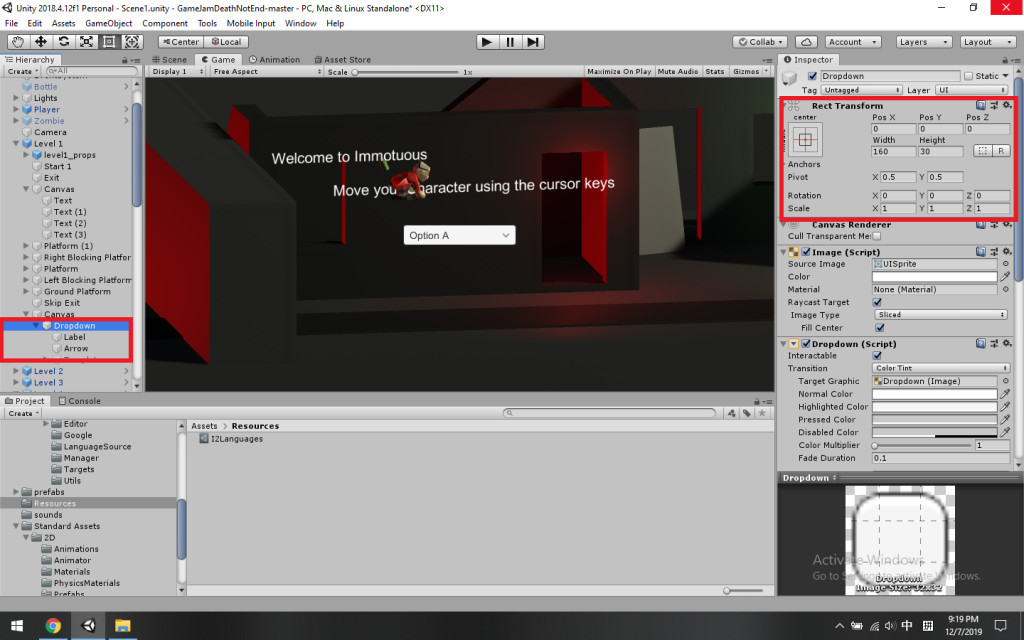
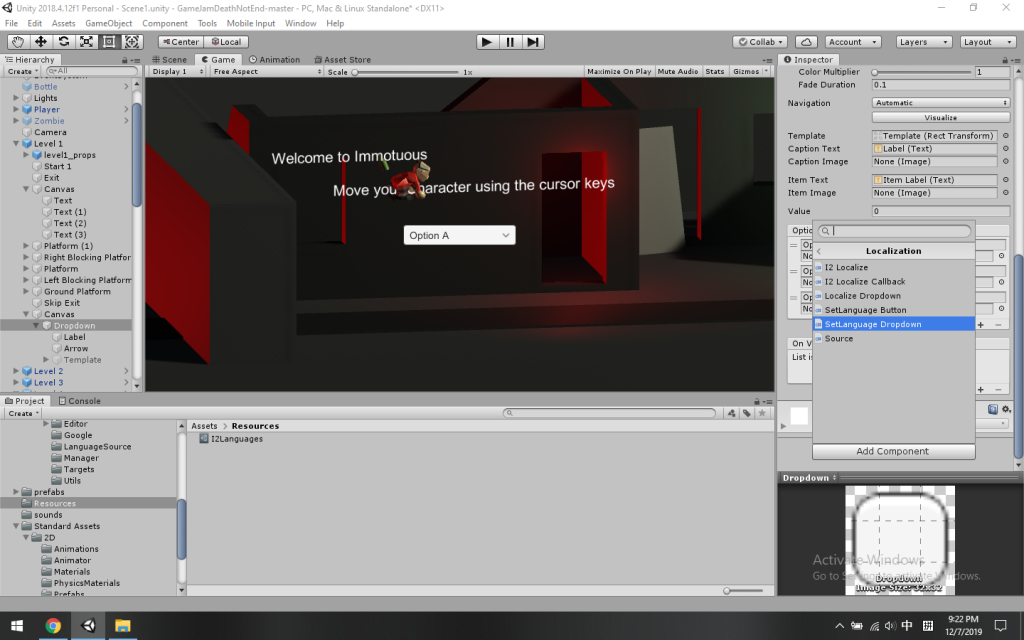
To make it possible to switch between the two languages, I added a language switcher. I did that by right clicking on “Level 1” and choosing UI→ Dropdown. Then I adjusted the size and location to make it appear where I wanted it to on the UI. After that, I connected the language switcher with the languages by going to “Dropdown” and adding a component called “SetLanguage Dropdown” . Then the language switcher was automatically populated with the two languages and I was able to switch between them using the language switcher. I did go and change the display name for “Chinese” to “中文” so that Chinese players can recognize it.

Dropdown
Size & location
Font style
SetLanguage dropdown

And that was it! The game was localized into Simplified Chinese. Here is a demo of the localized game.

Challenges

During the localization of this game, I came a cross a few challenges. The first one was locating the strings. In the Unity games I localized before, the strings were all located in the script files, but the strings in this one were located in the UI text elements, so I had a hard time finding the strings.

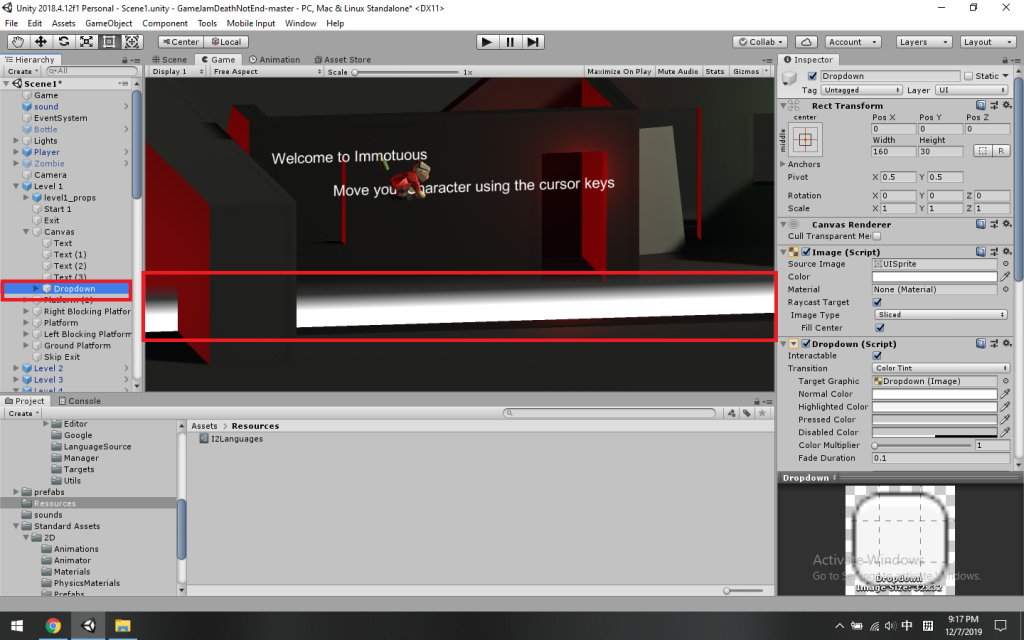
The second one was adding the language switcher. For the language switcher to appear in the UI, you have to add it in a specific way which is to right click on “Level 1” and choose UI→ Dropdown. If you highlight “Canvas” or anywhere else and add a dropdown, you’ll get a white bar across the UI like the picture below. It took me some time to figure this out.

Wrong dropdown

Best Practices

If you want to localize a Unity game, refer to I2 Localization Manual. It’s very useful and has all the information you need. If you are stuck, ask for help in I2 Localization support forum. You’ll find the answers you need there.

Translation Management Systems

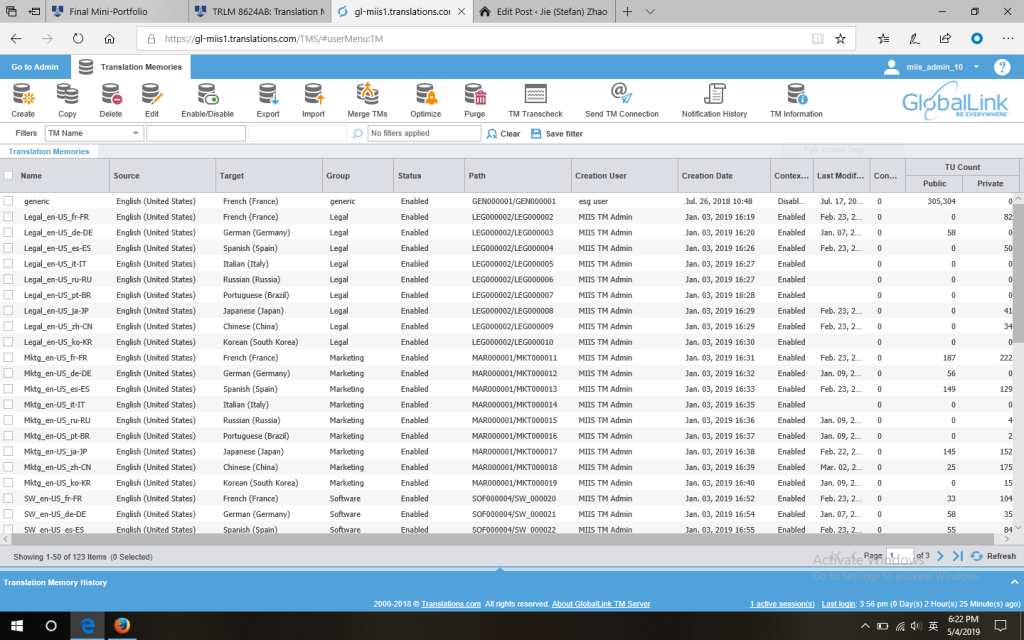
This semester in Translation Management Systems (TMS), we learned several TMSs, including SDL WorldServer, GlobalLink, Lingotek, and Unify. They are all very advanced tools and I learned many technical skills from using them.

SDL WorldServer

Based on what we leanred, we did two projects: TMS Comparison Project and TMS Consulting Project. Here’s what we did in these two projects.

TMS Comparison Project

In this project, we were tasked with evaluating and selecting a TMS for a particular company. We not only need to compare several TMSs and make a choice, but also persuade the company to buy into our choice. So we came up with the following process.

Choose a Company

First, we need to choose our client. It needs to be a company that has a certain amount of global presence and is in need of a mature and advanced localization process. We chose Huawei, a major telecommunications equipment and consumer electronics manufacturer in China. It has its own localization department and a team of in-house translators. It doesn’t have a TMS, so we thought it could use one to make its localization process more automated and efficient.

Develop a Scorecard

Then we looked more into our client and identified its key business requirements. We developed a scorecard to weigh those requirements. In the scorecard, we divided the stakeholders into several different categories: finance, project manager, linguist, IT, and internal client. We assigned each weight with a numeric value: must-have (5), really-want (4), important (3), nice-to-have (2), and somewhat-trivial (1). Based on our evaluation, we gave each business requirement a weight.

Compare TMSs

After we did some research on our client, we came up with 3 potential TMSs: SDL WorldServer, GlobalLink, and Memsource. We decided to run a project from start to end in those 3 TMSs and compare the results.

GlobalLink

For our source material, we pulled some contents from our client’s website and incorporated them into 2 Word documents: Huawei’s Global Industry Vision and a newsletter. We imported these 2 documents into the 3 TMSs and ran through the processes.

Project Presentation

After we finished running through the projects in the 3 TMSs, we made our observations into a presentation. In the presentation, we talked about our evaluation processes and results in the 3 TMSs. According to our evaluation, SDL WorldServer doesn’t meet the requirements of our client. GlobalLink is a potential candidate, but Memsource best suits our client’s needs. we came to these conclusions based on our calculation in the scorecard.

Memsource

TMS Consulting Project

Later this semester, we looked into Unify, a newly-developed private TMS owned by inWhatLanguage. We tried their demo version and provided our feedback and suggestions on the functionalities and features of the tool.

Then we had a meeting with the client and gave a presentation on our experience using the tool. In the presentation, we acted as a consultant and offered the client our professional opinions on what the tool is good at and what aspects need improvement.

Conclusion

This course has taught me a lot. Not only did I learn the leading and trending technologies in the translation and localization industry, I also got to play different roles and carry out real projects for real clients. It has really prepared me for future work and given me a insider look at the prospect of our industry’s market.

Advanced Technologies in CAT

This semester in Advanced CAT, we learned many advanced technologies in CAT and MT, including Microsoft Custom Translator, regular expression (Regex), and some utility tools.

SMT Training Project

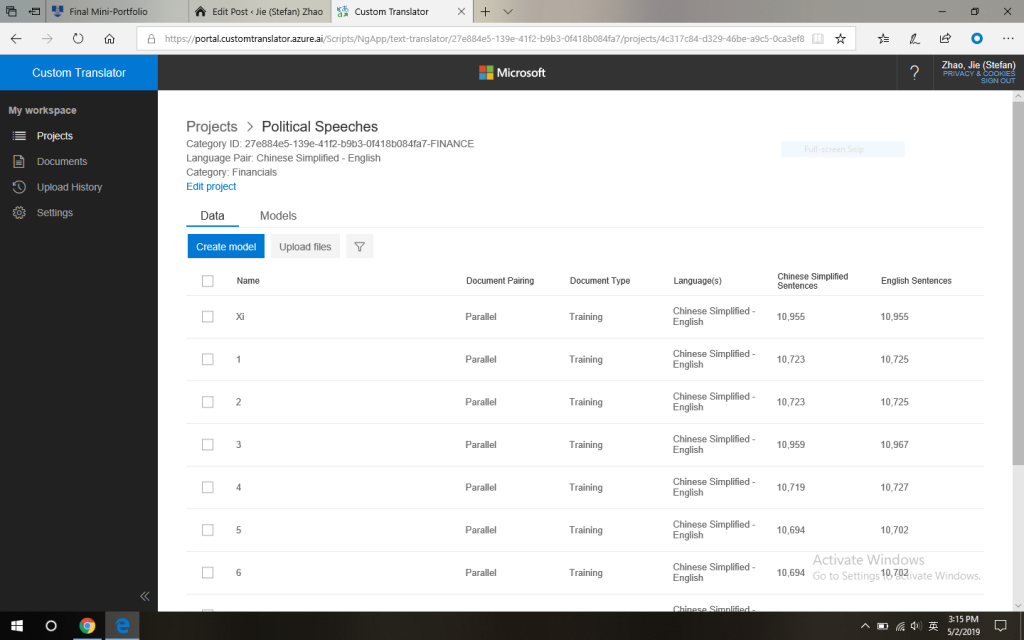
The first technology we learned was Microsoft Custom Translator, which we used to train Statistical Machine Translation (SMT) so that it could produce better translation results and save cost and time. So we started our first big project on SMT training.

Microsoft Custom Translator

Original Pilot Proposal

Before we started the project, we wanted to convince our client to adopt SMT. So we drew up a pilot project proposal. The pilot project aimed to estimate the work involved in training an SMT engine. We chose political speech as our
subject field, especially speeches given by President Xi Jinping. Our source content came from the official website of China Academy of Translation which provides the Chinese government’s speeches in both Chinese and English.

In the proposal, we estimate what it will take to meet Post-Edited Machine Translation (PEMT) goals, including efficiency, cost, and quality goals. We lay out the data we’ll use to train the engine, including training data, tuning data, and testing data. We come up with the process we’ll go through to achieve those goals. We set up the timeline with specific dates of each stage. We estimate the time and cost for each task. And we list the deliverables we’ll make at the end of the project.

Updated Proposal

After we went throught the pilot project, we got the actual results from our training, and we needed to update the original proposal. We used a sample from the MT results and compared it with the human translated version we pulled from the website. It turned out that the two were pretty close. There were some cases where the MT didn’t do a good job and they were typically numbers, proper nouns, verb tenses, capitalization, and plurality.

Based on the comparison, we were able to calculate the actual efficiency, cost, and quality results, and compare them to the original goals. We revised the original objective according to the calculation and updated the costs. We also gave our recommendation based on the outcome of the project. At the end of the proposal, we attached the MT sample and the detailed training rounds.

Lessons Learned

After finishing this project, we gave a presentation on what we learned from doing this project. There were some things we did right and also some problems we encountered. All in all, we met our goals and according to the training results, implementing this SMT engine in government documents like political speeches could save a lot of time and cost.

Based on the training results, we summarized what the SMT engine is good at translating and what it’s not. And finally, we made our recommendation.

Regular Expression

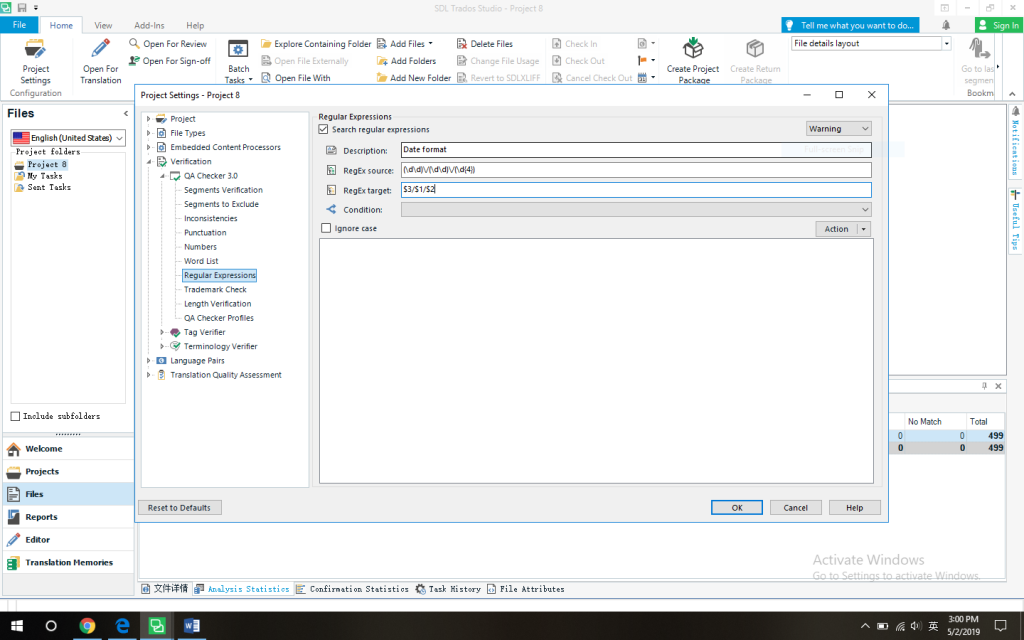
Later this semester, we learned some basic Regex. We used it to impelemt some QA settings in Trados. First, we experimented on how to use it on regex101.com. We learned how to use it to find some simple expressions like date, number, letter, and email address. Then we incorporated what we learned into Trados where we added some rules in the QA checker.

Trados QA Checker

After that, we each came up with some Regex specific to our language pair which we can use to check the quality of translation.

Utility Tools

At the end of this semester, we learned some useful utility tools. We each chose one that we were interested in and made a demo video about it where we talk about how to use it and how it can be useful in localization.

Localizing Game of Thrones Title Logo

This semester in Desktop Publishing, we learned how to use Adobe Creative Cloud to localize audio and visual contents, including pictures and videos.

For my final project, I chose to localize the title logo of the TV show Game of Thrones into simplified Chinese using Photoshop.

Image Source

Localization Process

Use content aware

The easiest and most efficient way to remove the original text without compromising the visual effect is to use content aware. This is also my favorite feature in Photoshop. It’s very good at recognizing boundaries.

First, I used the rectangular marquee tool to select the original text area. Then I went to Edit>Fill>Content Aware to apply the content-aware fill, and it worked without a hitch. I was able to remove the original text without damaging the background.

Create a text layer

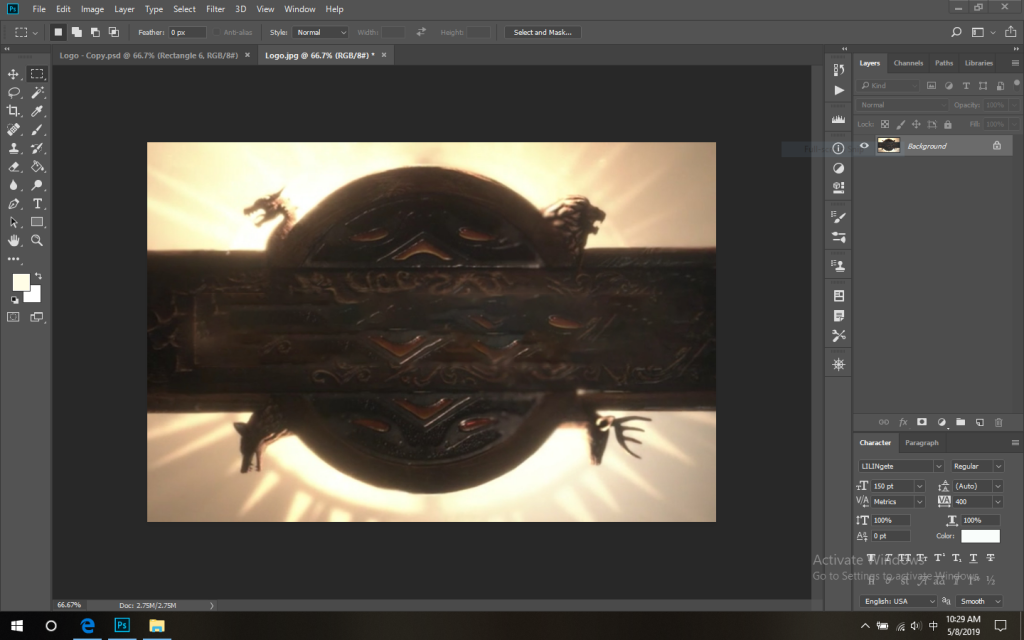
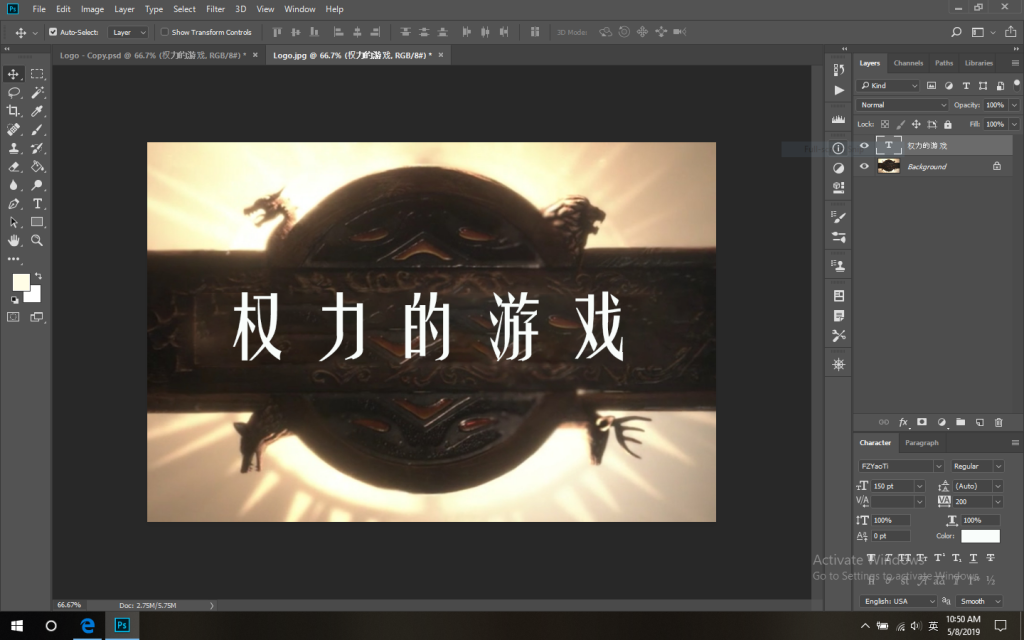
Before I removed the original text, I used the eyedropper to get the original text color. Then, I created a text layer and typed in the Chinese translation “权力的游戏”. Originally, I chose the font FZYaoTi, set kerning to 200 and font size to 150 pt, and applied the original text color to the Chinese characters with the paint bucket tool.

Apply glowing effect

As you can see in the source image, the original text has a kind of glowing effect. Although I can’t completely replicate that effect, I can make the Chinese text glow. I went to Layer>Layer Style>Blending Options and chose Outer Glow.

Font diving

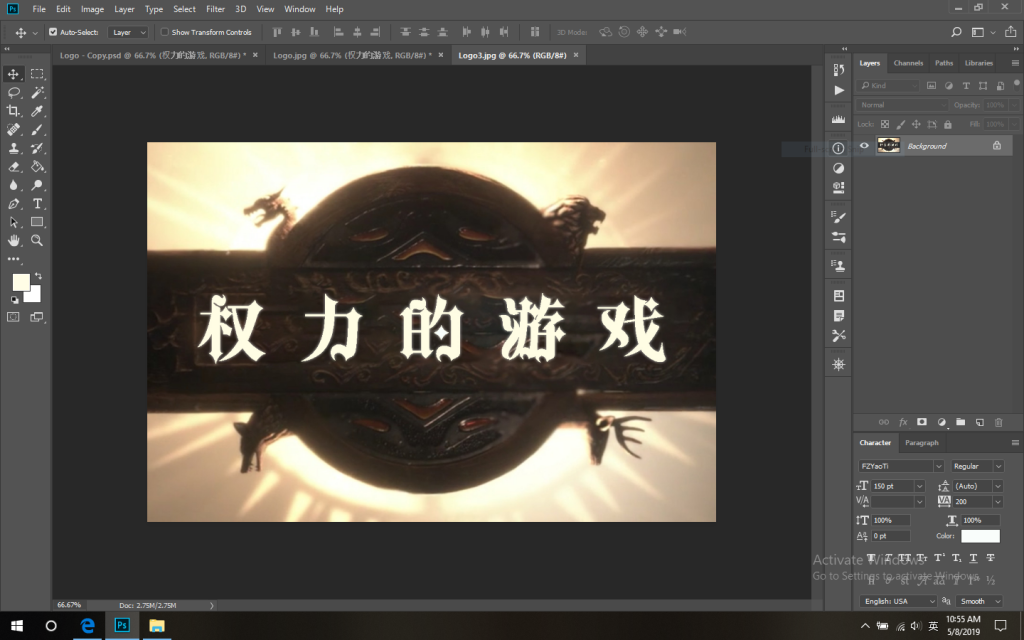
However, I’m not happy with the font, so I went to search for another font online. I found a kind of gothic font called “LILINgete” which has a unique artistic design. I downloaded and installed this font, and then applied it to the Chinese characters.

Also, I changed kerning to 400 so that the first Chinese character would fall in to the box in the background like the original.

Recreating text effect

As you can see in the source image, there are 3 bars inside each of the 2 Os and the stroke on T is also extended. So I started to recreate the bars and stroke. I used the rectangle tool to draw the bars and stroke. I perfected it until I was happy with it. This is what my final version looks like.

Problems Encountered

When I was using the paint bucket tool to apply the color of the original text to the Chinese characters, there was an error message saying that “This type layer must be rasterized before proceeding. Its text will no longer be editable. Rasterize the type?”. It reminded me that I should do this after I edit the text in the future. This step was also necessary to draw the bars and stroke because I couldn’t draw on a text layer.

Also during this process, the paint bucket tool couldn’t recognize where to apply the text color, so I used the magic wand tool to paint the outline of the Chinese characters. After that, it was able to recognize most of the characters, but there was still some tiny bits I couldn’t get, so I zoomed in a little more and got them all.

Another problem I encountered was that the Chinese text was a little pixelated after applying the original text color, especially when you zoom in. So I went to Type>Anti-Alias and selected smooth. It softened the pixellation a little bit, but it’s still a little pixelated. I think it’s related to the font because it has some sharp edges.

Conclusion

Doing this project has made me realize that desktop publishing is an art. There are so many skills involved and so many things to consider. You have to be both technically and artistically intelligent and also try your best to recreate the original effects on the localized version.

WPGlobus

This semester in Website Localization, we learned how to localize a website using different tools. We learned how to make a static website with HTML, CSS, and JavaScript. We learned how to use WordPress and Drupal to localize a website and make it multilingual. We also learned how to use proxy localization to localize a website.

For our final project, my group localized a website with a plugin in WordPress that we’ve never learned to use before. The plugin was WPGlobus and here’s how we used it to localize our website.

How Does WPGlobus Work?

First, we installed the plugin WPGlobus. Then we went to its interface and added the target language and a language switcher. After that, we went to pages and started translating. After all the pages were translated and published, we began to translate menus and widgets. And when that was finished, the website was basically localized.

Advantages & Disadvantages

After using this plugin to localize our website, we found that there were both advantages and disadvantages to it.

For the advantages, the biggest one is that it has a very simple and user-friendly interface. You only need to do one thing there which is to add the target languages and a language switcher. You can choose where and how you want to display your language switcher. You can display it on the menu with a language code, a full name (in target language), a flag, or a full name plus a flag. The second advantage is that you can directly translate pages, menus, and widgets in WordPress without using any additional plugins. There’s no need to export anything and you can easily switch back and forth between different languages. The third advantage is that it integrates perfectly with WordPress. You can choose to display the dashboard in different languages and translate the site title and tagline directly in settings. It even incorporates themes. You can translate different parts of the theme just by customizing it.

For the disadvantages, the first and foremost disadvantage is that you can’t export translation. This is especially bad for large websites that have a lot of content to translate, which requires a CAT tool with features like translation memory and machine translation. Also, translating directly in WordPress requires a basic understanding of Content Management System which most translators don’t have. The second disadvantage is that it can’t translate strings. A lot of widgets and themes have strings. With other multilingual plugins like WPML and Polylang, you can easily locate any strings and translate them, but you can’t do that with WPGlobus. The third disadvantage is that because you can’t export translation, you have to create a new account for each translator so that they have access to the admin page of the website. Since they are not familiar with Content Management System, they could easily mess something up or break the website. You could choose to train them beforehand, but it’s a time and cost consuming process.

Conclusion

In conclusion, we think that this plugin is suitable for small websites where there’s not a lot of content. But for large websites, it’s better to use WPML or Polylang so that you can export translation to a CAT tool where you can leverage resources like translation memory and machine translation to improve the efficiency of translation. However, its simple and user-friendly interface makes it a lot easier to learn than other multilingual plugins. Anyone with a basic knowledge of WordPress can use it without any problem. And it’s free. Multilingual plugins like WPML can support more advanced features but you have to pay an annual fee to get them. If you don’t want to spend any money on multilingual plugins, WPGlobus is your best choice.

CAT Project

This semester in Intro to CAT, we learned the CAT tool Trados. We basically covered every feature it has to offer. After we learned all that, we simulated a real life translation project where we experienced firsthand what it was like to work as a language service provider.

Here’s what our group did.

Project Proposal and Kickoff Meeting

First all of, we received our source content which was a 1469-word-long word doc about China’s healthcare that the client needed to be translated from English to Simplified Chinese. Then we prepared a project proposal based on that. In the project proposal, we described the project specifications and goals, laid out the timeline of the entire project, prepared a quote based on Trados reports and services needed, listed the resources required, and outlined the different stages of the project.

After that, we had our kickoff meeting with the client. It was a video conference where we went over the project proposal and communicated about the problems on both sides.

Project Implementation

After we had our kickoff meeting, we began to implement the project. There were altogether 3 stages of the project. The first stage was preparation where we prepared the source content for translation. During the stage of preparation, we ran a Trados report, did a pseudo translation, created a translation memory, added a term base, prepared a glossary, and came up with a style guide.

The second stage was production where translation, editing, and proofreading came in. We translated the content in Trados. While translating, we also kept updating and maintaining the translation memory to ensure consistency of the target language. Once translation was completed, the content was sent to the editing process where the editor would adjust the target language and formatting based on the style guide. After that, the content would go through proofreading where the proofreader would check the translation product to make sure that there were no major or minor mistakes and that we met all the requirements set by the client.

The last stage was finalization where we carried out the final verification and review. After making sure all things were in place, we delivered our product to the client.

Presentation on Lessons Learned

After we completed the translation project, we made a presentation about what we learned throughout the entire project. In our slides, we mentioned a lot of things we learned from doing this project.

First of all, because this was our first real life project, we got to experience many things that we couldn’t have experienced in class, like talking to the client, preparing a proposal, and having a project kickoff meeting. At the same time, we also came across many problems, but we learned to overcome them and find solutions. And since this was a team effort, we built a strong team relationship and carried out great team work because we learned how to cooperate with each other and coordinate our differences. Most importantly, with what we gained from this project, we will be more experienced and capable to handle future projects.

Talent Onboarding Process

This semester in Talent Management, we learned how to onboard a talent from start to end. In the process, we also set up our Talent Management Office on Process Street. Basically, our talent onboarding process can be divided into 4 stages: Initial Screening, Request for Information, Due Diligence Review, and Linguistic Evaluation.

Initial Screening

In this stage, we set up our profile screening & requirement checklist where we listed our requirements for the job candidate. We also developed the initial contact email template which we used to contact all the talents that met our requirements. For talent screening, we went to the ATA website, ProZ.com, and Translator’s Café to find the talents that we wanted. Our goal in this stage was to find as many talents that met our requirements as possible so that we could avoid missing any valuable talents.

Request for Information

In this stage, we would request some necessary information from the eligible talents we selected from stage 1. First, we developed an email template with files including New Talent Questionnaire and Independent Contractor Agreement. Then, we would send this email to all the candidates and ask them to fill out the necessary documents and send them back. After that, we would assess their responses to our request and score them according to a scorecard we developed. Candidates whose rates were too high or too low would be disqualified immediately. For candidates who were disqualified, we would send them a disqualification email to let them know why they were disqualified. We also developed a reference check email template which we used to contact the references candidates provided and ask them to fill out a reference request form so that we could check out the validity and strength of candidates’ references.

Due Diligence Review

In this stage, we would carry out a due diligence interview with the candidates we qualified in stage 2. During the interview, we would ask the candidates a series of questions about data security to make sure that we could work with them in a secure environment. After the interview, we would assess their responses according to another scorecard we developed. Same as stage 2, for candidates who were disqualified, we would send the disqualification email to them, telling them why they were disqualified; for candidates who were qualified, we would take them to the next stage.

Linguistic Evaluation

In this stage, we would first develop the test that the candidates were going to take. We had to take a lot of factors into consideration when choosing the source text. For example, the text couldn’t be too short because we wouldn’t be able to test the candidates’ skills without enough content, and it couldn’t be too long either because we shouldn’t expect candidates to do all that work for free. The total time candidates would need to complete the test shouldn’t exceed an hour. Also the domain of the text shouldn’t be too technical or informal and there should be both complex and simple sentence structures. Along with the source text, we also developed a style guide and a terminology list. This way, we could see if the candidates could deliver a professional product.

Then we would send them an email where we gave them 3 days to complete the test. After we received their deliverables, we would ask our test evaluators to evaluate their work based on the test evaluation scorecard we developed. In the scorecard, we indicated the abilities we were testing for, gave instructions for test evaluators on how to review the test, and designed a scorecard with error marking codes and weights for specific error types.

This was the last stage of the talent onboarding process. For candidates who didn’t pass the test, we would send them the disqualification email, and for candidates who passed the test, we would onboard them to our company.

The Met Project

This semester in Localization Project Management, our group localized the website of Metropolitan Museum of Art. In this project, we all acted as project managers and localized the website into 6 different languages. During the process, we also set up our LPM office. I learned a lot.

Here’s what we did throughout the entire project.

Wiki Page

This was essentially where we built our own website as an LSP. This was where we would store our company resources including staff, client and administrative information.

For staff information, we each designed a personal page where we would introduce ourselves to clients and tell them our qualifications and experience.

For client information, whenever there was a new client, we would document them in our client list and develop a new page where we would log the client’s basic information and any projects related to this client. In each project, there was another page where we would fill out the project specification form, list the talents available, and develop the quote and the translation package.

For administrative information, we would put the templates we developed for all projects there including client information, project specification, quote, talent screening, work order, purchase order, style guide, and email template.

Trello Board

This was where we listed all the things to be carried out in each stage of the project. The project was divided into 3 stages: pre-production, production, and post-production.

Under pre-production, there were submission, specification, quoting, and preparation 4 different processes. Submission was where we would ready a project submitted by the client for the development of project specification. Specification was where would ensure that we had worked out all the details (specifications) with the client and finalized the project parameters. Quoting was where we would list the specific items to be carried out throughout the project. Preparation was where we would lay out the deliverables to be included in the translation package.

The production stage consisted of 5 different processes: translation, editing, proofreading, final verification, and delivery. This was the most robust and time-consuming stage where we would actually produce deliverables for the client. The translation, editing, and proofreading checklists were quality control for translators, editors, and proofreaders where they could check and see if they had met the specific requirements. The final verification checklist was where we would check the final language service product prior to delivery to the client. The delivery checklist was where we would ensure that the client receives the language service deliverables according to the methods established in the specification form.

Under post-production, there was only one checklist where we would list the tasks to be carried out before project close, including making updates to reference materials and invoicing.

One Drive

This was where we stored all our documents and files related to this project. Each folder contained the specific deliverables from each stage. We followed a consistent naming convention for all our files so that they would never be mixed up. This way, we could easily locate any files we want through this network. For example, in the “Administrative” folder, there were our Top Tracker data and report as well as our “Client Facing Quote”. In the “From Client” folder, there was the source content we received from our client. In the “Preparation” folder, there was the content we prepared for translation…

Top Tracker

Within the scope of the entire project, we tracked our time at each stage using Top Tracker. It told us how much time we invested in each stage and helped us determine whether we were over or under budget.

© 2024 Stefan Zhao

Theme by Anders NorenUp ↑

Sites DOT MIISThe Middlebury Institute site network.