Stacy On Localization

Language. Culture. Localization.

Website Localization: localizing JavaScript Game “Hextris”

During website localization class this semester, one of the things we have discussed in class is to localize a game written in JavaScript. When we are hunting for a final project for this course, we came across this beautifully designed game called Hextris (Source: Github).

The game interface is quite straight forward. When game starts, some instructions will show up on the hexagon. The player can use the left and right arrow keys to spin the hexigon in the middle. If the player click the pause button, a “game paused” page will show up. Then the player can access “help page” by clicking the help button on the upper left corner, or restart the game by clicking the restart button on the lower left corner (see screenshots below).

(game start page)

(game paused page)

In order to localize the game, we need to translate the strings that show up during the game play, as well as add a language picker which allows players to switch between languages. As the game is very well designed aesthetically, we really wanted it to look as polished as it was after localization. So we decided to localize this game into four languages: Chinese, Japanese, French and Russian, and on top of this, add an awesome language picker which fits in the original design of the game.

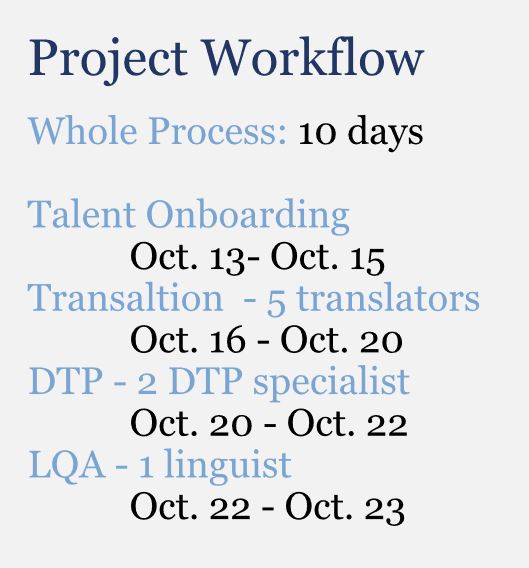
Workflow & Responsibilities

In this last semester website localization final project, we really want to imitate the real-world workflow, to divide up the job based on workflow and try to collaborate without understanding how others get things done. After discussion, we decided that our workflow will be:

  1. Implement 24 Ways
  2. String Translation
  3. Add language picker (non-functional yet)
  4. Make Language Picker Functional

In this workflow, I was responsible for the third step, which is to conceptualize a language picker and add it to the game interface.

Adding the awesome language picker

Conceptualization

In order to add a language picker that fits the logic and aesthetic design of the game, the first thing I did was to go through the game and see where the button should go, when it should appear and how it should look like.

Looking at the screenshot of the “game paused page” above, you might have noticed, as I did, that there are three hexagon buttons on three corners of the page. I then automatically thought that there should be a fourth button on the upper right corner of the page, in a hexagon shape, that appears when the player clicks the pause button. This button could be our language picker. In addition to this, in order to fit in the spinning theme of the game, I also wanted the button to spin once clicked, and then displays a language menu which allows the player to switch among languages.

(comceptualizing the language picker)

Creating the button in Photoshop

After conceptualization, it was time to bring this thing to life. As I really wanted the language picker to appear only on the “game paused page”, I looked into the other buttons that shows up at the same time. I chose “restart button” as the button to imitate, and looked into the html file to see how it is added to the game. It turns out that all the buttons were first created as an image (.svg file) and then added to the html. So I created the svg image using Photoshop and online converter, and linked it to our html. It successfully shows up in the game when I turned off the css style sheets. The next step is to make it pretty.

(creating language button in Photoshop)

CSS styling & JavaScript

It was not as hard to do css styling on this language button and menu as I originally thought. As the button was created in a hexagon shape with the right color, the only thing I need to do is to adjust the position, so that it stays on the upper right corner of the interface. When it comes to the language menu, I adjusted the font, position, background color and color. It looked quite chic already after all these, but I really wanted to make it able to spin.

I tried several methods to make the language button spin and then display the menu, like css rotate() and css animation, but they didn’t work out for me. My final resort is to try JQuery. After doing some research, I found an add-on JQuery library called JQuery rotates. There is even a piece of sample code on their website which is exactly what I needed. I adapted the code to my game, and it worked! Check out this video to take a look at our demo of the game after localization.


Localizing for the National Park Service, Point Reyes Seashore

Localization Practicum is the main course throughout the second year of TLM program at MIIS.  During the whole year, we work as employees of a student-driven LSP, Globe Multilingual Services, and run our own projects as project managers, engineers, DTP specialists and vendor managers. We reach out to the NGOs to see if they need localization services and onboard them as clients if they do. Newsletter localization for the Point Reyes Seashore of National Park Service is one of the projects I worked on as a project manager for Globe.

Project Description

The National Park Service (NPS) is a bureau of the U.S. Department of the Interior. The NPS preserves unimpaired the natural and cultural resources and values of the National Park System for the enjoyment, education, and inspiration of this and future generations.

The NPS Point Reyes National Seashore of California got in touch with Globe about a newsletter localization project. I accepted the project as a Globe project manager and was the main contact person for the client. I also worked as a DTP specialist on the project.

Project Scope

The Point Reyes Newsletter is a 12-page pdf with roughly 3500 words. It needed to be localized into Spanish (MX). There were also 3 maps embedded in the newsletter in scope. Therefore we had to do heavy DTP work that involved both InDesign and Photoshop.

I managed to get the source file in the .indd version on Oct.13, and the deadline for the project was Oct. 24. As client needed the localized newsletter for a public meeting on Oct. 25, we couldn’t afford any delay on this project. That means we only had 10 days turnaround time for the whole process.

Biggest Challenge

Upon getting the source file, I knew that short turnaround time would be my biggest challenge. As mentioned, we would need at least a translation > DTP > QA workflow. With the amount of DTP work involved, we would need at least 3 days for DTP plus 1 day for QA. Given the fact that we only work with volunteer translators on NGO projects, over 3000 words were apparently too much for one volunteer translator to finish within the time allowed.

One quick decision I made is to split the work among 5-6 translators. We will need to pay extra attention to consistency during QA, but this was basically the only way to finish the project on time. I also decided that we won’t be having editing phase in our workflow since it means extra linguists and extra time: we really don’t have time now.

Because I had no idea about the project scope before receiving the source file, talent onboarding have to start after Oct. 13. Time is ticking and luckily our vendor team was so efficient that we got all 5 translators ready to start by Oct. 15, each of them would be taking care of around 600 words.

Another measure I took to ensure on-time delivery was to onboard my most trusted internal resources for DTP and QA. Working with people I have a personal connection with got rid of a lot of back and forth. I got a huge amount of support from my peers so we were able to save tons of time in the post-translation process. We managed to deliver the project by EOD Oct.23, and the client was very happy with the quality. Please see our workflow and resources below:

From Practicum to Real World

In real-world project management, we will need to deal with rush jobs more often than we expect. Rush jobs are hard to handle: it is more difficult and takes more time to find available translators, even the smallest delay can cause bad results, and basically, no mistakes are allowed in the whole process. Here are some suggestions that might be helpful based on my experience managing this particular project:

Secure talents beforehand if you can. Once you know about the scope of the project before receiving the actual source file, you can start reaching out to your talents. Reaching out to linguist as early as possible will increase the chance of successful placement. You will also have extra time to resolve any technical issues your talents might have (in my case, setting up an account for them on Memsource).

Use your most trusted resources. In this practicum project, I was able to reach out directly to my peers in class, while in real-life projects, we might not have access to such resources. Therefore, building your pool of trusted talent is crucial and essential for every project manager: they are the people that can help you out in situations like this. Fostering your relationship with linguists on a daily basis is more important than you might see. After all, project management is about “people” rather than actual “projects”.

This post is also published on Globe Multilingual Service website, click here to view.

Case Study: TMS Recommendation for the LDS Church

Situation Analysis:

The Church of Jesus Christ of Latter-day Saints (known as the LDS Church or, informally, the Mormon Church) is a Christian restorationist church that is considered by its members to be the restoration of the original church founded by Jesus Christ. In their localization group, they have been using three different management platforms: SDL WorldServer, Workfront, and Clarity. The reason for using three at the same time is they don’t find anyone of them can fulfill all their needs.

  • SDL WorldServer: they use WorldServer as their workflow engine. It is also used to manage their linguistic assets like TM and TB.
  • Clarity: Clarity is used in the group for actual project tracking. It basically makes up the business PM function that WorldServer lacks. It is also used to issue payment (PO issuing). Because of heavy customization, the current version of the system cannot be updated.
  • Workfront: Workfront is implemented as the HQ project tracking system for upper management to oversee the process.


Problem Analysis

LDS Church is mainly facing two problems:

  • Problem 1: Can’t pay by TM leverage.

Because language resources including Translation Memory are managed by WorldServer, while billing is processed by Clarity, LDS church can’t pay translators by TM leverages.

  • Problem 2: Manual system sync

The three platforms that LDS church is using doesn’t talk to each other. As workflow is processed on WorldServer, and localization project management is performed on Clarity, workflows have to be manually inputted into Clarity system to sync with WorldServer. Data was also manually inputted into the third system Workfront which reports to the upper management. In order to handle the system sync, LDS church has to hire extra personnel specifically dedicated to data input.


Solution Analysis

The major need for LDS church is integration among three systems. It might be difficult to find three systems that can integrate with each other, but it’s not to find two systems that communicate well. Therefore, one possible solution is replacing two systems with one new system that can cover the functions of former ones. However, as LDS church has been heavily relying on WorldServer for language assets, their translators are also trained on WorldServer, it would be highly impossible to replace it with other systems. Workfront as the management system of the whole company is also unlikely to be changed to fulfill the needs of localization team. So the only system that can be replaced is Clarity.

The goal is to find a business-oriented TMS which integrates with WorldServer. Three widely used business oriented TMS are LTC Worx, Plunet, and XTRF.

  • LTC Worx: a web-based business system for global companies that need to produce and manage high volumes of multilingual content and products. Does not integrate with WorldServer.
  • Plunet: In version 5.3 of Plunet, it now offers interfaces to the existing translation technologies SDL WorldServer, Wordfast, XTM and Jive Fusion.
  • XTRF: XTRF can integrate with a wide range of CAT tool including memoQ, Memsource, SDL Trados Studio and XTM, but it does not support WorldServer integration.

Because of Plunet’s new function, Plunet was implemented to replace Clarity in order to achieve better integration among systems.

TMS Professional Portfolio

THIS professional portfolio shows the knowledge and skills I learned during the Translation Management Systems (TMS) class at MIIS. In TMS class, we navigate through the widely used TMS SDL WorldServer and accomplished a project with it. We also intensively discussed the how to choose, implement and integrate a TMS for a company.  This portfolio includes a SOW for the WorldServer project, project deliverables and the presentation slides on lessons learned. It also includes three professional blog posts on TMS selection suggestions.

1. WorldServer Project

We worked in a group of five and did a mock-up project using WorldServer. Our client this time is the Beijing Office of NewYork Times, asking us to translate a word document from their website into Simplified Chinese.

Please find our SOW here:RainbowCat_SOWforTMS

Project deliverables, including:

  • Source files
  • Pseudo-translation files
  • Target files
  • Translation memory and term base

Can be downloaded here:

https://drive.google.com/file/d/14pNsudSTexLjhmBIZNM_TAKi4QS8c975/view?usp=sharing

A presentation on lessons learned during the project can be found here: TMS Group Pre

2. Professional Blog Posts.

During the semester, I wrote three blog posts on TMS selection and evaluation. Please find the links down here:

What Do You Want From a TMS Other Than Boosting Efficiency

Choosing a Proper TMS for Your Company: 4 Important Questions to Ask


Photoshop DTP Showcase: Project Workflow and Reflections

Description of project

For the final showcase project for the Multilingual DTP course, I chose to localize a poster of Indie game Don’t Starve. The original file is a jpg picture with English texts (see below), and I decided to localize it into Chinese and Spanish, respectively representing CJK languages and European languages.

The workflow

  1. Text preparation. As I didn’t have the .psd file with separate text layers, the first thing I did after I got the source picture was to type everything that needs to be translated into an excel file. I chose to use excel because most of the sentences are lacking subject, verbs or punctuation signs. Putting them in word or .txt might confuse the CAT tools.
  2. Finding the right fonts. Find font websites are really useful in looking for matching fonts in European languages, but it doesn’t work for CJK languages. I find the same fonts in the poster on these websites, and I resorted to font preview databases in Chinese for Chinese fonts. After choosing the right fonts, I downloaded them and store them in the font folder for use.
  3. Masking: Hiding the original texts is an inevitable step for every Photoshop DTP project without pdf source files. As the background of the poster has really complicated colors and a lot of textures, I chose to use patch tool to remove the texts. Content awareness also works sometimes, but as for the drawings of coastlines in the background, content awareness can’t figure out the consistency of it. (see below before and after removing the texts)
  4. Replacing the texts with translated ones. This also includes testing the pre-chosen fonts and matching font size, leading, kerning, as well as font width.
  5. Work on the title. 
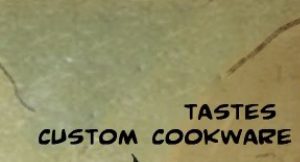
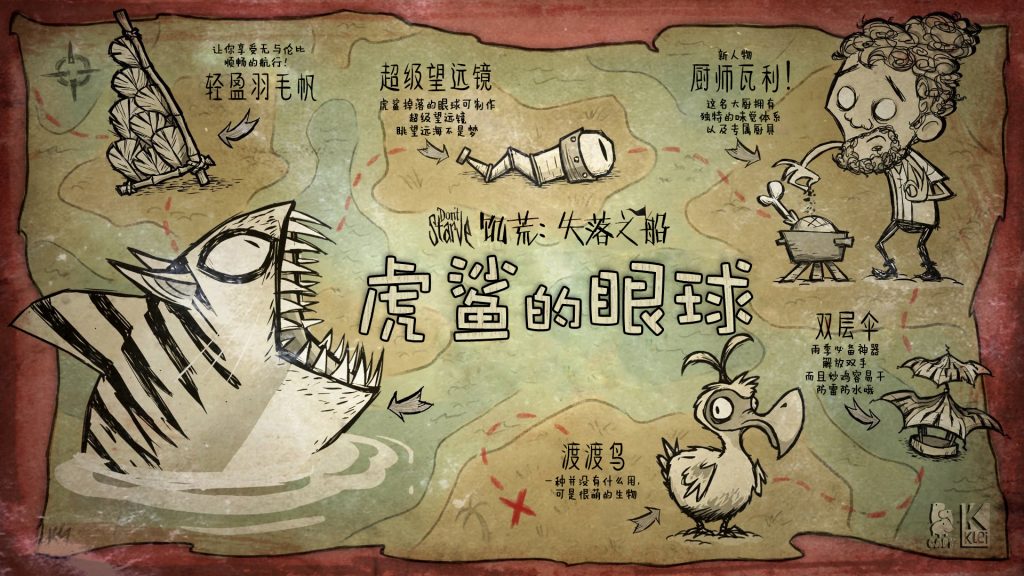
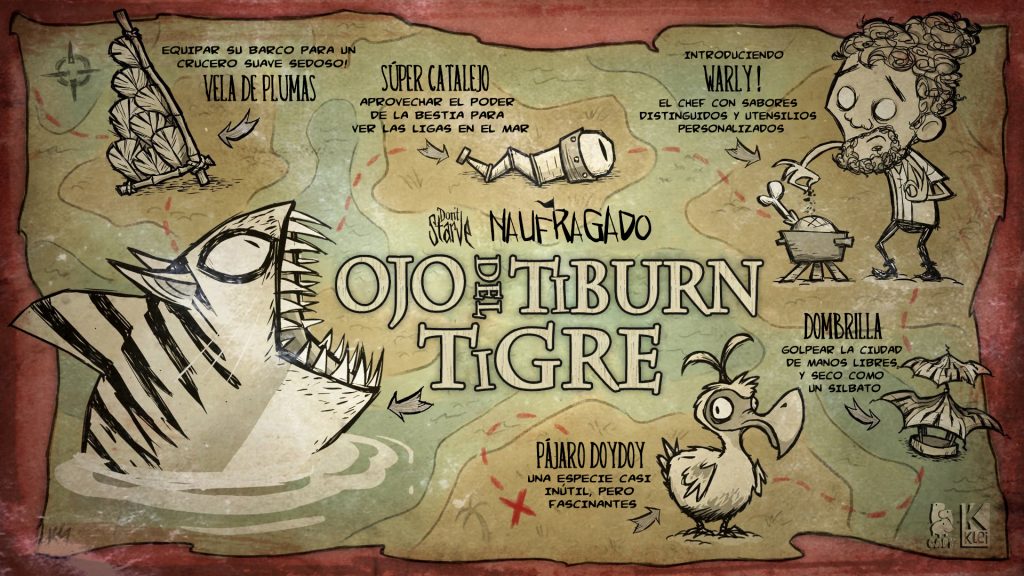
Figuring out the basic design of the title is the first step. The title looks complicated but in essence, it’s in bold font, light yellow color with the black stroke. After figuring that out, it is not difficult to imitate the effect in layer styles. The texture is the second thing I worked on. There is a subtle wood texture inside the words of the title. To achieve the same effect, I selected the pattern with the marquee tool, went to edit – define the pattern, and saved it as a pattern. Then I used the pattern stamp tool to paint the texture onto the words.
    To paint on a text layer, I had to rasterize it or create a new layer on top of it. A small tip in painting patterns is holding ctrl and click on the layer, Photoshop will automatically turn everything on the layer into a selection. Then you can paint the patterns inside the selection and don’t have to worry about getting the pattern everywhere.
  6. Review. After I was done with the texts, I zoomed out the poster into its original size and looked at the overall effect of it. While I was doing the Spanish version, I found that the words are too crowded, so I adjusted the font size and leading to make it look better. (see below for the final products)

Small tips for Photoshop DTP projects

  1. Copy the background layer (the source .jpg layer) before start working on anything and keep it locked. Only work on the copied layer. Then if anything goes wrong, you won’t ruin the original picture.
  2. Ctrl/command + Z is always your best friend when you do something you don’t like, or accidentally ruined the whole thing. History window also does the same thing. You can always go back to the step that goes wrong by simply clicking on that step shown in this window. You can go to windows – show/hide history to open the history window. Keep in mind that the history can only hold limited steps, it is sometimes impossible if you want to go way back.
  3. Organized and clearly named layers are extremely helpful in boosting efficiency, especially when you are dealing with a large and complicated project. Keeping Layers in groups are also very helpful.
  4. Use different websites to find fonts. There is not only one find font website out there, and they don’t share the same database. If you fail to find the perfect font on one website, try other ones: they might even have free fonts.
  5. The final review is necessary. It is important to double check the details like typos, it is more so to look at the poster as a whole when it’s done. The overall layout is extremely important in most Photoshop products, especially in posters.

What Do You Want From a TMS Other Than Boosting Efficiency

WHEN we talk about TMS, the first thing that comes to our mind is how it can help boost efficiency through automation.  However, is this our only expectation from a good TMS? A TMS is a platform our vendors have to deal with on a daily basis, it is also the window for our clients to know about project progress when they need to. TMS as the platform that ties these two parties with us should be able to facilitate cooperation, appropriate information sharing, and communication. XTRF as an online management tool designed specifically for translation related projects effectively connects the PM, vender, and clients together.

  1. PM Portal:

The PM portal of the XTRF is the most powerful one. It improves PM’s working efficiency in at least four ways:

  • It allows PM’s access to as much information as he/she can, and store them for him/her under categories.
  • It sends emails to the right person automatically with all details included. Manually mistakes like emails sent to the wrong person and missing information will be avoided.
  • Scheduling becomes easier with XTRF. It incorporates the Gantt chart to helps PM keep track of everything going on. On top of that, PM can get a notification when something goes wrong so that he/she can fix it as soon as possible.
  • Jobs are assigned to the appropriate person. With all the information entered by vendors, XTRF automatically gives PM a list of suitable vendors, so that you don’t have to look them up on your own list. It also automatically assigns the files to the right person, which is again, use to be done through email or cloud drives.
  1. Client portal
  • requesting quote becomes much easier. Clients used to request quotes through email, or with more advanced technologies, on the LSP’s website. But the former one is inefficient, as sometimes the clients don’t know what details need to be included to get a quote, which may result in many follow up email negotiations. And the latter one is not transparent: you enter the things required or uploaded the file, and it goes into a black box and comes out with your quote. XTRF client portal allows clients to get the quote as soon as possible, with details can be explained later easily, as it came out with PM’s adjustment, rather than just a built-in algorithm. You can even provide the PM an analysis file yourself so that you get more control of the breakdowns of your file.
  • The client can get to know the project process easily. Rather than contacting the account manager and get a vague status report, they will see the progress directly. This builds trust between us and the client.
  1. Vendor portal
  • Vendor information like vacation time, minimum offer, rates, availability, etc. are documented in XTRF. The system avoids sending vendors assignments when they are on vacation or sending them projects that don’t meet their rates. Many vendors find receiving irrelevant project emails from PMs annoying, and XTRF improves the vendor-PM relationship by eliminating unnecessary emails.
  • Receiving and delivering files are easier with XTRF. You can say goodbye to your file classification on your computer, and don’t worry about losing them, because all of them are saved in the cloud.

XTRF ties the three major participants of a translation project together, which makes it much easier for three of them to keep track of the project. At the same time, it keeps a comfortable distance of privacy between the three.

Choosing a Proper TMS for Your Company: 4 Important Questions to Ask

IN order to keep up with the fast development of the industry, many companies have started developing or purchasing their own translation management systems, or TMS. However, what is the right time to implement a TMS? How to adopt a TMS? Which TMS solution to choose? These questions are not easy to answer.

In Why You Might Need Help Selecting a TMS, Lee Densmer writes about three main reasons on why choosing a TMS is hard. An unstable TMS market makes it hard to invest in a system that can last for a long time. Too many choices can also bewilder the companies, making them spend more time and effort in searching for the perfect-fit solution. The risk for wasting budget on unnecessary features is also high when it comes to TMS. Asking yourself the following questions may help you have a clearer clue.

  1. To buy or to develop?

In Translation Management Systems: build or buy, Benjamin B. Sargent talks about four stages of technology solution development. According to him, the TMS market has entered stage C, where feature competition is well at play, and companies have plenty of off-the-shelf solutions to choose from. Generally speaking, in this stage, your newly developed self-owned TMS can hardly compete with the well-developed solutions in the market. However, before heading to the TMS supermarket to shop for one, the option of developing your own tool is still there. In the year 2017, there are still companies developing their own tool, because this tool can be customized to their use, fit their needs perfectly, and boost their efficiency in largest scale. If you do have the budget for developing, maintaining and expanding your own system, building your own TMS can be beneficial in the long run.

  1. What do you from the TMS?

As mentioned before, which so many choices on the shelf, it’s really easy to get lost and end up with spending extra money. Even if you are developing your own TMS, it’s also hard to decide which feature to include. Therefore, doing a self-assessment can be really important. In Eight Steps To A Successful TMS Roll-Out, Andrew Lawless points out some steps that can be taken in assessing your needs:

  • Finding the pain: Find out what bothers you most in your existing project management process.
  • Audit your workflows: Examine your existing workflow. Identify flaws in it and prepare it for future TMS implementation.
  • Define what can be automated: Look for the most manual and redundant steps in your project management, and think about where it’s possible to get it automated.
  • Define what needs to be managed outside the TMS: It’s important to know what you don’t need your TMS to do. Do you want to do invoicing, or documentation within the TMS?
  1. Which TMS fulfills your needs best?

Most TMS in the market can be characterized into three types:

  • Business-oriented: Focus more on the management of company or department. Offers files/projects tracking and includes invoicing/billing functions.
  • Language-oriented: Have more powerful linguistic functions like an online editor, pseudo-translation, TM and TB management.
  • Comprehensive: Have both two functions mentioned above. But can be a master-of-none.

After doing need assessment, you should be able to identify which type you are looking for. Doing some research into the existing TMS and putting them into different groups can help you eliminate a lot of bad options.

  1. Is the system compatible with your existing system?

After narrowing the list down to one category, now it’s time to get down to implementation details. What content management tools are you using on your website? What CAT tools are you using? What billing system are you using? If the TMS is not compatible with these tools, it will be a great pain when it comes to implementation.

The best solution to this problem is to give it a test drive. Choosing one small project from every workflow can give the TMS a good test in compatibility. If there are problems, it’s still not too late to troubleshoot. Running several pilot projects before real implementation starts can let you know whether you like the TMS or not.

Chooisng the right TMS needs a lot of consideration. Please make sure to take your time researching and investigating your internal needs, I’m sure the time spent will be worthwhile in the long run.

Tips on Using SDL Trados

IN a highly globalized world, there is a huge demand for highly efficient translation. While machine transition may fulfill some of the need, the rest of the work has to be done by efficient human translation. Therefore, for translators in today’s world, computer-assisted translation tools, or CAT tools, are necessary skills to boost efficiency. Among these tools, one of the most popular ones is SDL Trados. Here are some tips for translators who just begin to use this tool.

  1. Before translation: Always remember fun Pseudo Translation. It’s always better to let your clients identify your potential problems and solve them before you start the actual translation job. If something goes wrong after you have translated the whole thing, much more work will have to be done to fix them.
  2. Before translation: Make sure you have the translatable file type. The most common file types that Trados can deal with are doc files, .txt files and excel files. Typical untranslatable file types include pdf. and picture files like jpg. and png. When your client provides you with source texts in untranslatable file types, do contact them to ask for a file in the file type that the file is originally created. You can always right-click on the file, go to “properties” to see which software was the file created by and ask your client for that type of file.
  3. During translation: Translation memories and term bases are extremely useful tools when it comes to hard texts, make use of them! When you are working with fixed clients, TM is a good tool for you. It automatically calls out similar sentences you have translated before. So it saves an extremely large amount of time. The termbase tool that comes along with Trados, SDL multiterm, is a powerful terminology tool for your glossaries. Many of you may have been doing your glossaries using Microsoft Excel. The good news is you can directly import your excel file into multiterm, and then use them in Trados.
  4. After translation: Auto spell check comes in handy when you need to do quality assurance for your final deliverables. Review and QA automation in Trados are nice tools for that. Right-click on the file and open it for review, and find check spelling in the review navigation pane, then Trados will do all the work for you. You can also customize the QA checker. You can make it report an error when it finds unnatural repetition of words, or when the translated segment is way longer/shorter than the original one.

Like any other software, the rule of practice makes prefers also applies to Trados. The only way to master it is to continue using it. It might be frustrating at first, but after you master it, you will discover the power of it.

Sites DOT MIISThe Middlebury Institute site network.