
Intro
Quick question! How do you localize an After Effect video? The answer seems pretty straightforward: ask your client to provide an AE project file (.aep), investigate it thoroughly to see whether you are able to access the texts in the video, either pull them out using an AE library aetextio or create a picture list of the texts manually, feed the texts into a CAT tool to translate, and then import them back to the video either through aetextio or manually. This is the ideal scenario because the source texts in the video are not in your way. They can be replaced by target texts directly. However, if you can’t get a project file from your client, things can get a little bit crazy. You’ll have to hide the source texts away and reproduce all the effects for your target texts.
With a goal to challenge myself to learn the different text effects in AE I localized this 1’27 long commercial of Google from scratch:
Seems pretty simple right? Well, it actually took me a solid 22 hours to finish it, and I am going to show you what’s taking me so long. Maybe you will be able to sense the challenges I faced in the finished target video:
Challenges
1. Masking through Shapes
Fortunately, the background colors of the texts in the video are mostly monotone, so the most efficient way to mask the source texts is to create shapes. It’s not as simple as you might think though because the source texts move a lot and the colors/brightnesses of the backgrounds change if they are buttons!

In these cases, you’ll have to create several shapes for different frames and carefully match their appearances and motions against the buttons in the source.

In the screenshot, you can see that in order to match the motions and opaqueness of the button and the message box, I created several shapes.
- My tips:
- Start from the creation of relatively static backgrounds, like those without any animation.
- Then move on to the animated backgrounds. Create shapes larger than texts and with some extra room and match their positions to the motions of the texts.
- If the source texts are magnified, adjust the sizes of the shapes under “scale”.
- If the background colors changes, duplicate the shapes and change the colors using the “eyedropper” feature.
- If the brightness of the background color changes, duplicate the shape and place it at the frame when the changes start. Adjust the color of target shapes to the color of source shapes that appear in the middle of the brightness gradation process. Then you can apply the “Brightness & Contrast” effect to adjust the brightness of the target shape accordingly.
2. Masking with the New Feature: “Content Aware Fill”
This new feature isn’t that difficult to apply. I learned the gists in this Youtube tutorial. Users just need to mark the movements of the objects they want to remove with shape masks (created directly on the video layer):

I experimented with different fill methods, and found that “Edge Blend” works best with my video.

The result is quite impressive:

- My tips:
- Limit the range of “Content Aware Fill” to “Work Area”. Otherwise, it will take AE days to generate the .png mask that hides the objects away.
- Hide the shape masks of your objects by moving them outside of the display area. Or the shape masks will be there during the entire video, and you will “content aware fill” something that should not be removed.
3. Recreating Typewriter Effect
In the source video, typewriter special effect occurs whenever there is a search bar.

There is already a typewriter effect in the effect library, with which I created my credit at the end of the video. However, it does not come with a cursor:

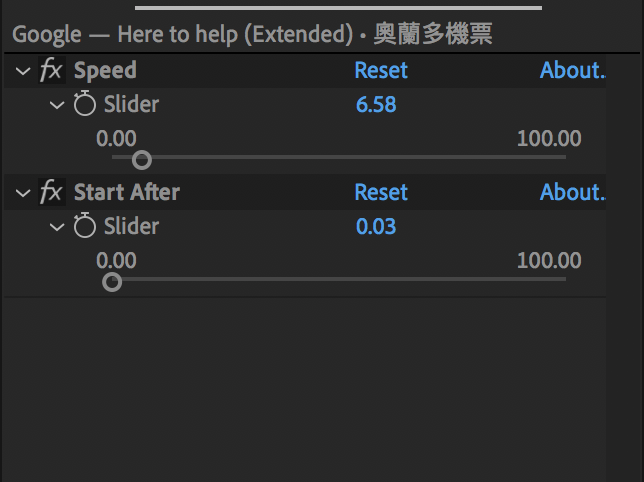
Therefore, I turned to Youtube for help. This tutorial taught me how to install a text effect preset in AE, and I managed to match the speeds and starting points of the typewriter effects by endless experiments with the “Speed” and “Start After” setting:
- My tips:
- Align target texts to source texts first.
- Adjust Start After setting. For Chinese characters, the number should be pretty small. 0.01 to 0.05 work just fine.
- Then you can match the speeds against those of the source texts.
4. Recreating Blur Effect
Sometimes, the shapes do not fit well with the backgrounds when they are not absolutely monotone or static. In these cases, you can apply “Fast Box Blur” effect to soften the edges of the shapes.
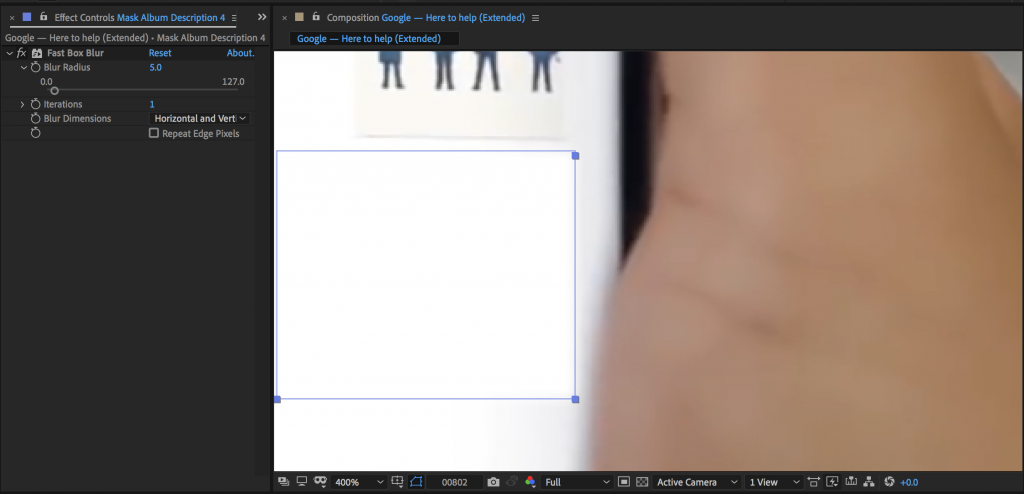
Sometimes the source texts also move so fast that they look blurry. You can apply the “Fast Box Blur” effect to the target texts to match the animation of the source texts in this case.

5. Adjusting Contents in the Video to fit Text Contraction/Expansion
Inevitably, when a language is translated into another, the texts expand or contract. In this project, when English is translated into traditional Chinese, it shrinks a great deal. You can see the length differences of the texts in the following screenshots:


In such cases, besides texts, video contents also need to be adjusted as well. I believe it’s feasible to recreate the objects and animations directly in AE. Worst case scenario, users can always create them in Photoshop or screenshoot the objects, import the image files into AE, and then animated them. Due to time constraints, I wasn’t able to incorporate these additional side projects this time, but I believe they are definitely fun to work on too!
Key Takeaways
1. Always adjust the beginning and end keyframes first, and then work on the middle keyframes if needed.
2. If the backgrounds are monotone , stay with shapes. “Content aware fills” takes longer time, involves more steps, and is very CPU-consuming.
3. Organize the layers well! Rename and lock every layer after creations or modifications to prevent unintentional changes or, worse case, deletion.
4. Analyze shapes movements before creation. Group the shapes of the same movements together to modify them in bulk and ensure consistent spacing in between.
5. Display grids when you are positioning texts or shapes. Tiny spacing issues often slip through if you only rely on your sense.

6. Numbers are your guide when you are matching the fonts and positions of texts.

Final Thoughts on After Effects
Through this challenging no-source-video localization project, I learn the most important lesson the hard way:
Never localize AE videos when there are no source files!!!
Consider the additional AE and Photoshop projects to fix text expansion and contraction as well as the excruciating masking and animation recreation process. If you have no other choices but to do so,
Estimate billable hours smartly. Charge enough for your time and efforts.
Also, the new “content aware fill” feature is powerful, indeed, but it’s not intelligent. Users must manually insert tons of keyframes to mark an object that needs to be removed. If Adobe can automate the object recognition and marking process, it will definitely save users a lot of tedious manual work.
Last but not least, one final appeal to Adobe: Can we have features like animation (motion, opaqueness, position, brightness, etc) detectors? I tried many of the set effects in the library, but I wasn’t able to to create identical animations for the source texts with any of them, so I had to create the animations keyframe by keyframe from scratch. I believe loc engineers and DTP specialists who are responsible of reproduce text animations and text integration would definitely appreciate some sort of AI detectors! Go Adobe! We count on you!
