L10n Automation with Python

Learning programming seems to be a trending area of study among in the field of localization. Computers offer us the means to connect with every aspect of our business and optimize our workflows, but not everyone is taking full advantage of what they have to offer. This is why learning to code has been a critical part of my learning and continual professional development in the field. 

Learning to program with Python

Programming with Python has one of the lowest barriers to entry to those who have no background in computer science like myself. I was able to teach myself enough Python to write an automation script that helped me quickly execute the mundane and tedious task of registering for classes, and ironically helped me register for my first Python class, Intro to Programming with Python. Here is a very early demo video of the automation script working:

Localization Automation with Python

The excitement of being able to automate such a boring task using programming inspired me to pursue learning and exploring more on my own. So for my final practicum project I decided to team up with a few of my colleagues to figure out a way to automate a localization process that prepares files for translation.

The task we decided to look at was localizing JavaScript for applications and websites, a process that involves finding the strings of text that need to be taken out and prepared for translation, and then imported back to the source. This process sounds complicated but there are a few methods, known as internationalization frameworks, that can make extracting and inserting translated strings an efficient process. We wanted to take this process further by using Python’s powerful automation capabilities to streamline the workflow.

Part of this project grew out of inspiration from a file automation script I made for automating project management tasks. The main component I drew upon was utilizing Pathlib to handle file paths as objects to manipulate them cleanly and efficiently. I highly recommend looking into this module for use in scripting with Python as it makes working with folders and paths very efficient. Here is a preview of the script I wrote to help count files using pathlib:

The main project libraries we chose for this program were Beautiful Soup which allows us to take in HTML files for analysis. We first started with HTML files and then used our script to make a copy of the file and extract all of the strings. Then the program creates a .js file that has the source string and an empty string that will be filled with the translation when it gets uploaded to a CAT tool and translated by a linguist. This way, files can be easily re imported and used in the main program.

Below is a picture of the first few functions of our program. The wrapStrings function takes in an html file and makes a new file with all the strings wrapped in our _( ) 24 ways function. 

The next function in the script copies the entire folder,essentially making a backup for your files in case anything goes wrong or you want to keep the original version of the files before sending them off for translation

The last part of the program looks for all html files in the folder and calls our getStrings and wrapStrings functions to extract and prepare the files for translation in a CAT tool. I hope you enjoyed reading about this project and if you are interested in more details, feel free to check out a 10 min video we made on the entire project including where we think the project can go from here in case anyone is interested in picking up where we left off. Our project files are hosted for you to download if you want and feel free to reach out if you have any questions.

Link to Python Research Video:

Game localization in Unreal Engine 4

Game developers have many choices for how to make their games. Using game engines is an increasingly popular choice, and some of the game engines like Unity and Unreal Engine have even started including localization solutions. My favorite engine to work with has been Unreal Engine 4 because of the user interface compared to Unity seems much friendlier. Unreal also has an experimental Localization Dashboard that makes adding locales and translating game text very convenient with its builtin functionality. In this project, I localized the game ActionRPG I’ll explain in this post how I accomplished a successful localization and some challenges I faced in the process.

The main interface of Unreal Engine 4, with folder structure, assets and game preview

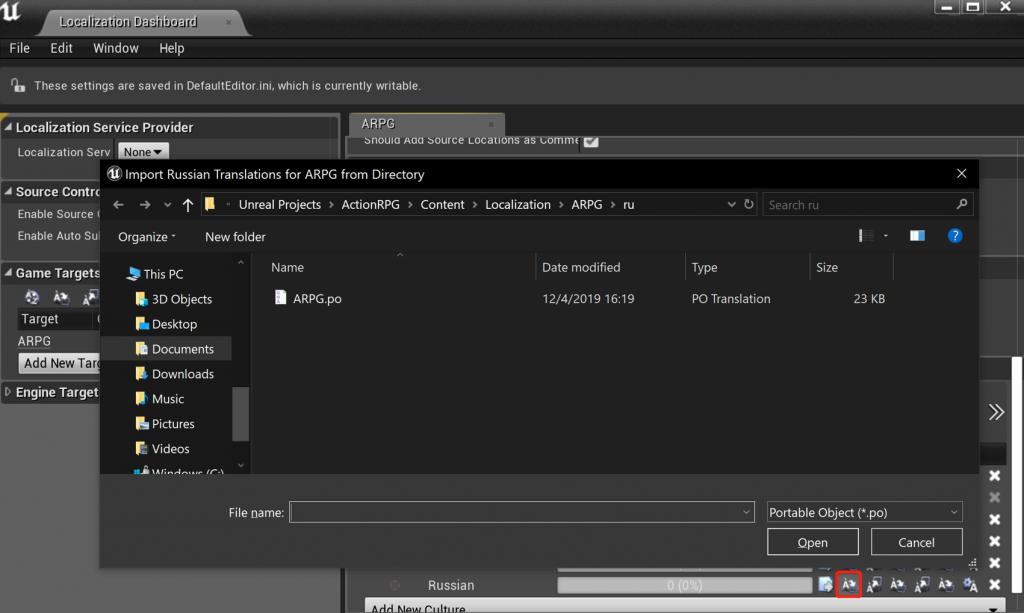
One of the benefits of using the L10n Dashboard is that it can automatically scan the game contents folder for translatable strings and extract them into a portable object file (.po) and build a localization folder structure in the main game’s project folder. From there I was able to use my translation tool to insert machine translations to test how the translations would import back into the game and if they would appear correctly. One of the tools I used is Poedit which supports the .po files that the engine creates and offers a convenient machine translation feature to input the translations automatically. (Note: the free version of Poedit only lets you insert up to 10 translations from MT, but restarting the app seems to reset the limit).

The Localization Dashboard after exporting text for translation outputs a PO file. The export and import translations buttons are at the lower right side of the dashboard.

Challenges and issues

Back in the UE dashboard I can now import the translated .po file and compile the game, but in order to play the game in the new language I have to change the language of the editor under preferences. Playing the translated game I noticed there were now a few problems. Foremost, there were some strings of text that did not get translated, and the game’s default font was incompatible with non-roman character languages like Chinese and Russian.

The game is unable to render the Chinese text in the default font, only displaying tofu

There was also no way to change the current language in-game without stopping the game, and changing the language preference of the UE editor itself. For the font issue, it seemed that changing the font would work in the Dashboard’s built in translation editor, a convenient way to change your translations, but sadly the change font button did not work, even after installing and adding fonts to the Engine.

The Dashboard lets you edit translations, but the “Choose Translation Font” wasn’t working

While spending time to figure out how to add a language switcher since our languages displayed “tofu” for Chinese and Russian, I stumbled upon the UI folder within the game’s structure. This folder was home to the font used by the game which only supported the French and English versions. It turns out that by editing the font in this folder offers an option for a fallback font in case the game can’t display the default font, which is exactly what was needed for Chinese and Russian to work. This discovery of the UI folder and game font was what helped make this project a success in showing how localizing your game in UE4 can be a smooth experience if you know where to look in the game folders and how to edit the assets in the Engine.

Game fonts are stored under UI and can be edited to include a fallback font in case the main font is unsupported, as was the case for the non-roman character languages.

Takeaways

The localization dashboard proved to be very useful in this project, and combined with what I think this is one of the benefits that UE has over engines like Unity, the “blueprint” mapping system used to program game assets gives UE a nice advantage. UE is also a good choice since there’s no need to implement localization directly into code unless the developers have strings that are unreachable by the engine. In the end though, I think being familiar with the methods of localizing games in both Unity and UE will be beneficial since both engines offer a different approach to solving the same problem. I like how the blueprinting in UE gives you a concept map overview of your scripts and assets, adding to the utility of the localization dashboard, while Unity offers the key:value localization method with its I2 localization plugin. I still give UE the edge over Unity when it comes to usability and functionality.

Title screen of the game, successfully localized into Chinese and Russian

Subtitling in Premiere Pro

Frame perfect English subtitling to Chinese open subs in Premiere Pro

I love developing skills with audio/visual software and desktop publishing tools. Working with Adobe creative suite to manage graphics, audio and videos is one of my favorite parts of creating and localizing content. I particularly love Premiere Pro because of it’s intuitive timeline views and project preview panels that comes with a nice array of animation and audio mixing features to satisfy most video editing needs. Recently I had a cool idea for a project that combines some subtitling skills I learned in the open source VisualSubSync Enhanced program to see how adding subtitles in Premiere would be.

My goal for this project is to subtitle at least the first 8 minutes of a 20 min episode of a Chinese dating game show featuring an American speaking fluent Chinese! I couldn’t decide if it would be better to first bring my segment into VisualSubSync to translate and generate a subtitle file (.srt) and then bring it into Premiere to line up with the already burnt-in Chinese subtitles, or if I should just go directly into adding them into Premiere. I decided just to go right into Premiere and add my subtitles since I would have to translate them myself on the spot and could simply just specify exactly which frame to have them come in and go out, perfectly in sync with the Chinese open subtitles. I encountered a few issues when getting started, but after I got the hang of it, I was able to add the subtitles with ease. First, here is a look at how I configured my workspace in Premiere:

In my bottom right I have open the captions panel, the most important tool for adding subtitles into the project, to the left is the timeline and then the project files panel. Above the timeline I have the program preview pane and the toolbar to the left of the program monitor, and the effect controls panel. I have the caption panel stretched out wide so I have access to all the tools available on the pane, otherwise they would go off screen. After getting my space set up and importing my source file, I got my 8 min segment into the timeline and then add a ‘caption stream’ to the timeline (the pink bar in the timeline) by going into the project files and adding a new file -> captions.

The next window displays the type of captions to add, the caption stream and timebase. I selected CEA-608 since I didn’t know anything really about these presets, other than open captions would burn in the subtitles where the other ones would generate an srt file. This option would prove to be an issue a bit later. Fortunately Premiere automatically chooses the right timebase according to the video you are currently working in, and being in 25 fps made it slightly easier to get my subtitles in perfect sync with the Chinese burnt in ones.

When I had my caption settings all ready and began adding my subtitles, I had a problem. The captions were not showing up in my program monitor video preview. After spending some time investigating the issue, I figured out that Closed Caption Display had to be enabled in the preview window under the wrench icon in the bottom right corner of the preview pane. Additionally, after enabling I still wasn’t getting them to display, and as it turns out, you also needed to go into settings under enable and select which caption stream and caption standard to be displayed before your subtitles will show up with Closed Caption Display enabled.

Now that I had my captions displaying in the preview, I wanted to modify the font and change the background and position but couldn’t seem to find any way to change these in the caption pane I had.


I figured out that only after changing my caption standard to Open Captions will I get the options that I need to have an invisible background, text color and size options. So I had to settle for generating burnt in open subtitles for the project since it seems like the other caption presets didn’t allow for modifying the text.

I highlighted the text editing buttons with the blue box, and the positioning parameters in the red. The only other thing I wanted to configure for my subtitles was their position relative to the burnt in Chinese ones and this can be done by either clicking on the small grid box or dragging the x and y values. I had envisioned them being below the Chinese subtitles but for some reason Premiere has a built in margin around the video preventing captions from going below the Chinese, so I had to settle for having them above the Chinese rather than below, not a big deal though.

Once I finally overcame the initial issues, adding subtitles became easy, but was still very time consuming adding the in and out time of each sub to line up with the Chinese, hence why I had to stop halfway from my original goal. Overall it was a great project and I’m glad I chose to use Premiere to do subtitling. You can take a look at the final video here and feel free to compare to the original video.

JavaScript Internationalization

I’ve been exploring localizing websites by learning how to write and manage static web content as well as learning various content management systems such as Drupal and WordPress. One of the most interesting things was localizing JavaScript for applications and websites, a process that involves finding the strings of text that need to be taken out and prepared for translation, and then imported back to the source. This process sounds complicated but there are a few methods, known as internationalization frameworks, that can make extracting and inserting translated strings an efficient process. One of the important reasons for learning this method is so that with a larger project, all the engineer needs to do is pull out the strings and prepare them to send to a translator which can then be put back in the right places.

I learned that one of the best ways to do this was using a very simple and easy to use framework called 24Ways. But for this project, we wanted to try out a different but somewhat similar framework called LocalePlanet. At first glance, LocalePlanet seemed fairly straightforward and easy to implement. But after a few hours of running this framework, we realized that the program the author uses to extract strings, called GNU gettext, is actually not an executable program (it turns out its actually a command line program), and appeared to be geared towards developers that needed to prepare translation files for software programs in development. With no clear getting started guides or documentation that could be understood with our level of knowledge, we decided to change directions and go back to using the 24Ways method which we were more familiar with.

I wouldn’t discredit LocalePlanet at all, but it is unfortunate that it involves understanding a program that isn’t user friendly (specifically it requires using a command line program that was not obvious at the time). Using 24Ways involves setting up a folder structure where we have a language folder containing our strings in the root where js and and a folder for where a copy of the game is placed that will be eventually translated.

One of the easy mistakes to make when considering folders and files is to not link the .js files correctly in the main index.html file. In the above image, we forgot to include a backslash indicating that the link is to a file a folder up in the directory, so it should have been ../ instead of just two dots.

When choosing the game that we wanted to localize, we wanted to find something simple that didn’t contain many strings or too many files. This is because we wanted to focus on implementing the internationalization framework, also abbreviated as i18n.

Most of the games that we downloaded and tested out actually only contained one simple HTML file that ran the JavaScript or CSS directly in the HTML using a script tag. We thought it would make more sense however to remove all the JavaScript from the HTML and just make a new file called game.js and link it to the HTML in the <head> since we already have a js folder which contains our 24Ways function. This also cleans up the HTML and cuts down the number of lines of code in the file we had to deal with.

In implementing the 24Ways function, each string is ‘wrapped’ like this: _(s) where s is the string. The tricky part is that some strings that contain single or double quotes may have to be removed when placed in the strings file, otherwise they won’t output correctly. In the game over string on line 33, we didn’t realize that we needed to remove the single quotes when copying it into our strings file.

This image below is what the string will look like after it is translated:

And here is a look at the game we localized: